Paddling enthusiasts know that the journey to the water begins long before your kayak touches the surface. For many, the biggest hurdle isn’t navigating rapids or perfecting their J-stroke—it’s wrestling with cumbersome roof racks that require an engineering degree and a toolbox just to get out of the driveway. Tool-free kayak roof racks have revolutionized this experience, offering a liberating blend of convenience, portability, and security that traditional systems simply can’t match. Whether you’re a weekend warrior with multiple vehicles or a solo adventurer who values independence, understanding what makes these lightweight systems tick will transform how you think about gear transportation.
The evolution of clamp-based, cam-lever, and strap-tensioned mounting technology means you no longer have to choose between convenience and safety. Modern tool-free designs can support substantial weight loads while protecting both your kayak and your vehicle’s finish. But not all systems are created equal, and the market’s expansion has made it crucial to understand the nuances of construction, compatibility, and real-world performance before investing in your setup.
Top 10 Lightweight Kayak Roof Racks Tool-Free Installation
Detailed Product Reviews
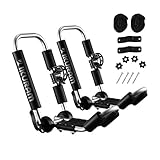
1. Yakima - JayHook Rooftop Mounted Kayak Rack for Vehicles, Carries 1 Kayak

Overview: The Yakima JayHook is a premium J-cradle kayak carrier designed for single boat transport up to 80 pounds. This system features universal mounting hardware that fits most crossbars with a minimum 24-inch spread. The tool-free installation process takes approximately 10 minutes, making it accessible for users of all skill levels. Heavy-duty straps and bow/stern tie-downs are included, providing a complete solution out of the box.
What Makes It Stand Out: The J-shaped cradle design optimizes roof space while delivering exceptional stability during transit. Unlike many competitors, Yakima includes all necessary hardware and straps, eliminating hidden costs. The durable padded contact points protect both your kayak and vehicle finish. The tool-free installation is genuinely quick and intuitive, perfect for seasonal users who frequently install and remove the system.
Value for Money: At $198.95, the JayHook commands a premium price that reflects Yakima’s reputation for durability and customer support. While significantly more expensive than budget alternatives, the comprehensive accessory package and proven reliability justify the investment for serious paddlers. The cost-per-use becomes reasonable for those who paddle regularly throughout the season.
Strengths and Weaknesses: Pros:
- Premium construction with excellent padding
- Complete strap and hardware kit included
- Genuine tool-free installation
- Space-efficient J-cradle design
- Strong brand reputation and warranty
Cons:
- Higher price point limits accessibility
- Single-kayak capacity only
- Requires minimum 24" crossbar spread
- Not compatible with all factory racks
Bottom Line: A worthwhile investment for dedicated solo kayakers prioritizing quality, convenience, and long-term reliability over upfront cost.
2. YAKIMA HandRoll Rooftop Mounted Kayak Rack for Vehicles with Heavy Duty Strap, Bow, and Stern Tie Down, Tool Free Installation, Set of 2 Kayak Rollers

Overview: The YAKIMA HandRoll revolutionizes kayak loading with its innovative roller-based design. This set of two pivoting rollers assists in loading a single kayak onto your roof rack, significantly reducing the physical effort required. The system includes heavy-duty straps and bow/stern tie-downs, with tool-free mounting to most crossbars requiring a 24-inch minimum spread.
What Makes It Stand Out: The large rubber rollers provide genuine load assistance, allowing solo paddlers to slide rather than lift their kayak into position. The pivoting base automatically conforms to your hull shape and locks securely for transport. This design is particularly valuable for heavy kayaks or users with limited mobility. The quality of the rollers and pivot mechanism exceeds typical budget alternatives.
Value for Money: Priced at $168.95, the HandRoll sits in the mid-to-premium range. The roller innovation adds significant value for those who struggle with traditional loading methods. However, the system only provides load assistance—you’ll still need adequate crossbar padding. For users who don’t need load assistance, simpler J-bar systems offer better value.
Strengths and Weaknesses: Pros:
- Exceptional load assist for easy solo loading
- Pivoting base adapts to hull shapes
- High-quality rubber rollers
- Tool-free installation
- Includes essential tie-down straps
Cons:
- Requires additional crossbar padding
- HoodAnchor needed for some vehicles
- Single-kayak limitation
- Rollers may wear with heavy use
Bottom Line: Ideal for solo paddlers who prioritize effortless loading over maximum carrying capacity or budget considerations.
3. Abahub Soft Roof Rack Pads with 2 Tie Down Straps, 2 Tie Down Ropes, 2 Hood Loops and Storage Bag, for Surfboard, Kayak, Canoe, Heavy Duty Universal Car Roof Racks System (Black PE)

Overview: The Abahub Soft Roof Rack offers universal transport solution for multiple water sports. This affordable system uses durable 1680D fabric with EVA foam padding to protect gear on virtually any vehicle, with or without side rails. The comprehensive kit includes straps, ropes, hood loops, and a storage bag, accommodating kayaks, surfboards, SUPs, and canoes.
What Makes It Stand Out: Unparalleled versatility at a budget price point. While hard-mounted systems lock you into specific configurations, this soft rack adapts to different gear and vehicles instantly. The reinforced PVC coating and non-slip bottom provide surprising durability and stability. The inclusion of multiple strap types and a storage bag demonstrates exceptional attention to value.
Value for Money: At $46.97, this represents the best entry-level value in kayak transport. You receive a complete system for less than a single premium J-bar costs. The versatility across sports and vehicles multiplies its value proposition. Occasional paddlers and multi-sport enthusiasts get maximum utility for minimal investment, though frequent users may eventually desire a more permanent solution.
Strengths and Weaknesses: Pros:
- Extreme versatility across gear types
- Universal vehicle compatibility
- Complete accessory kit included
- Outstanding budget price
- Scratch-resistant neoprene sleeves
Cons:
- Less secure than hard-mounted racks
- Not suitable for heavy kayaks
- Potential wind noise at speed
- Requires meticulous installation
- Durability concerns with frequent use
Bottom Line: An exceptional choice for budget-conscious adventurers needing flexible transport for various gear types across multiple vehicles.
4. PIRIPARA Kayak Roof Rack 2 Pairs J-Bar Carrier Holder for Canoe, SUV, Cars, Truck, Surf Ski, Car Top Mount Racks for Trip, Set of 4

Overview: The PIRIPARA system delivers impressive capacity with four J-bar carriers (two pairs) capable of transporting two kayaks simultaneously. Constructed from sturdy alloy steel with rust-resistant coating, this set supports up to 150 pounds total. The wide-mouth J-bars simplify loading while adjustable padding protects your boats during transit.
What Makes It Stand Out: The ability to carry two kayaks for under $60 is remarkable. Most systems at this price point only support one boat. The alloy steel construction provides durability that rivals more expensive options. The quick on/off hardware facilitates seasonal installation and removal. This system essentially gives you tandem capacity at a single-kayak price.
Value for Money: At $58.98, the value proposition is outstanding. You’re receiving four J-bars with straps and hardware for less than many single-kayak premium systems cost. The 150-pound capacity handles most recreational kayaks. While finish quality and padding thickness don’t match premium brands, the functionality and capacity are undeniable bargains for couples or families.
Strengths and Weaknesses: Pros:
- Carries two kayaks (150 lbs total capacity)
- Exceptional price for tandem transport
- Sturdy alloy steel construction
- Quick installation hardware
- Includes four heavy-duty straps
Cons:
- Incompatible with round crossbars
- Padding quality is basic
- No bow/stern tie-downs included
- Hardware durability concerns long-term
- Finish may rust over time
Bottom Line: A fantastic budget solution for pairs or families needing reliable two-kayak transport without premium brand pricing.
5. FORWODE Premium Kayak Roof Rack, 1 Pair J-Bar Roof Rack, Folding Adjustable Rack, Weight 80 LBS Heavy Duty Kayak Roof Carrier 1 Kayak, Canoe, SUV, Surfboard on SUV, Car and Truck Crossbar

Overview: The FORWODE J-Bar system features a unique folding design that collapses flat when not in use, addressing wind resistance and garage clearance concerns. Constructed from high-strength carbon steel with 1.2mm thick walls, this single-kayak carrier supports up to 80 pounds. The system includes ratchet straps, S-hook pulleys, anchor belts, and integrated paddle holders.
What Makes It Stand Out: The folding mechanism is genuinely innovative, allowing daily drivers to minimize drag and noise during non-paddling days. The carbon steel construction offers excellent strength-to-weight ratio. Integrated paddle storage is a thoughtful addition that keeps gear organized. The inclusion of multiple strap types provides versatility for different boat shapes and sizes.
Value for Money: At $69.99, this sits in the sweet spot between budget and premium. The folding feature justifies the moderate price increase over basic J-bars. While brand recognition doesn’t match Yakima, the quality materials and intelligent design offer compelling value. For daily drivers who paddle weekly, the convenience of folding racks adds significant practical value.
Strengths and Weaknesses: Pros:
- Folding design reduces drag and clearance issues
- Carbon steel construction
- Integrated paddle storage
- Multiple strap types included
- Thick rubber and foam protection
Cons:
- Single-kayak capacity only
- Folding mechanism may wear
- Lesser-known brand
- 80 lbs capacity limits some boats
- Installation slightly more complex
Bottom Line: Perfect for daily drivers seeking a rack that adapts to their lifestyle by folding away when adventure calls aren’t constant.
6. 2 Pairs Kayak Roof Rack for Car Top Roof Mount Carrier J Cross Bar Canoe Boat

Overview:
This four-rack system provides a budget-friendly solution for transporting two kayaks simultaneously. The steel J-bars feature adjustable padding and accommodate kayaks up to 36 inches wide and 75 pounds each. Designed for universal compatibility, it works with most factory or aftermarket square, oval, and flat crossbars while explicitly excluding round bars under 1.2 inches in diameter.
What Makes It Stand Out:
Security-conscious design elements set this carrier apart. Anti-loosening screws prevent installation issues during transit, while the included 1-inch wide, 10-foot long straps boast an impressive 600-pound break strength. The wide-mouth J-bar profile simplifies loading and unloading, and the all-surface rust-resistant coating extends product longevity.
Value for Money:
At $58.99 for a complete two-kayak system, this offering sits in the mid-range price bracket. The inclusion of four racks, mounting hardware, and two heavy-duty straps provides solid value, though additional straps would be necessary for optimal security on both boats.
Strengths and Weaknesses:
Strengths include robust security features, decent weight capacity, straightforward installation with protective hardware design, and broad crossbar compatibility. Weaknesses involve potential long-term rust issues despite coating, limited strap quantity, and incompatibility with round crossbars.
Bottom Line:
A reliable choice for budget-minded paddlers prioritizing security and ease of use, provided they have compatible crossbars and supplement the strap count.
7. 2-Pack Kayak Roof Rack Carrier - Heavy-Duty J-Style Crossbar Mount for Kayak/Canoe/Surf Ski (75lb Capacity), Includes 4 Ratchet Tie-Down Straps & Rust-Resistant Hardware (Fits Square/Oval/Flat Bars)

Overview:
This heavy-duty two-pack carrier system delivers professional-grade transport capabilities for kayaking enthusiasts. The J-style racks support kayaks up to 75 pounds and 36 inches wide, mounting securely to square, oval, and flat crossbars. Pre-assembled components and quick-release clamps enable true tool-free installation in approximately two minutes.
What Makes It Stand Out:
The scratch-proof installation system represents a significant innovation, using protective pads and quick-release clamps that prevent vehicle surface damage during mounting or repositioning. The full-body powder-coated steel frame combined with corrosion-resistant hardware provides exceptional all-weather defense, particularly against saltwater exposure.
Value for Money:
Priced at $68.99, this kit costs slightly more than budget alternatives but claims 40% savings versus purchasing single units separately. The premium rust protection, pre-assembly, and protective features justify the modest price increase for serious users.
Strengths and Weaknesses:
Major strengths include rapid installation, superior corrosion resistance, adjustable foam padding for hull protection, and robust 600-pound break strength straps. The primary weakness is the limited strap quantity for securing two kayaks, likely requiring additional tie-downs for full peace of mind.
Bottom Line:
An excellent investment for paddlers seeking durable, hassle-free installation and superior weather resistance without breaking the bank.
8. DOHUSPLE Kayak Roof Rack for 2 Kayaks Carrier, Kayak J Bar Hooks Roof Mount Racks for Universal Cars, SUV, Truck, Set of 4 Racks

Overview:
The DOHUSPLE four-rack system offers the most economical solution for transporting two kayaks, with a total capacity of 150 pounds. The J-bar design secures boats on their side, minimizing roof space usage while accommodating various watercraft including canoes, surfboards, and skis. The steel construction features a smooth baking finish for enhanced corrosion resistance and extended service life.
What Makes It Stand Out:
Unbeatable affordability defines this carrier, priced significantly below competitors while still providing four complete racks. The bottom flange thread design enables remarkably fast installation and removal in mere minutes without complex tools or hardware. This universal fit system works with virtually all crossbar shapes except round bars, maximizing compatibility.
Value for Money:
At $39.99, this represents exceptional value for budget-conscious buyers or occasional paddlers. The price point makes it accessible to entry-level users who might otherwise forego roof transport altogether, delivering core functionality at a fraction of premium brand costs.
Strengths and Weaknesses:
Strengths include the lowest market price, straightforward installation, decent combined weight capacity, and versatile application beyond just kayaks. Weaknesses involve basic steel construction that may still be prone to rust over time, minimal padding details, and unclear strap inclusion, potentially requiring separate purchase.
Bottom Line:
Perfect for cost-driven consumers seeking functional two-kayak transport, though long-term durability may not match pricier alternatives.
9. Kayak Roof Rack, Aluminum Kayak Carrier Folding J-Style Universal 3-in-1 Multifunction for Canoe, SUP, Kayaks, Surfboard Rooftop Mount on SUV, Car and Truck Crossbars
Overview:
This premium aluminum kayak carrier represents the pinnacle of rooftop transport innovation with its 3-in-1 multifunction design. Constructed from anodized aviation-grade aluminum alloys, the system offers lightweight durability and complete rust resistance. The folding J-cradle accommodates kayaks and SUPs up to 36 inches wide, featuring oversized all-weather rubber saddles and padded uprights for maximum hull protection.
What Makes It Stand Out:
The quick raise and fold mechanism, operated via a convenient front release handle, dramatically increases overhead clearance when not in use and locks at various angles to accommodate different hull shapes. The included heavy-duty straps boast an exceptional 750-pound break strength, while integrated paddle holders provide convenient accessory transport.
Value for Money:
At $109.99, this is the most expensive option reviewed, but the aircraft-grade aluminum construction, folding capability, and versatile configurations justify the premium for serious enthusiasts. The long-term durability and multi-sport functionality offset the initial investment.
Strengths and Weaknesses:
Strengths include lightweight rust-proof materials, space-saving fold-down design, superior padding, high break strength straps, and paddle holder integration. The primary weakness is the high price point, which may exceed casual users’ needs.
Bottom Line:
The ultimate choice for dedicated paddlers seeking premium materials, innovative design, and versatile functionality that lasts for years.
10. Malone Stax Pro2 Universal Car Rack Folding Kayak Carrier (2 Boat Carrier)

Overview:
The Malone Stax Pro2 offers a unique stacking approach to two-boat transport, distinguishing itself from traditional J-bar systems. This carrier features octagonal aluminum posts and injection-molded nylon platforms that stabilize boats during tie-down. The system folds flat when not in use, improving fuel economy and garage clearance while fitting round, square, and most factory oval crossbars with universal JAWZ hardware.
What Makes It Stand Out:
As the only reviewed product compatible with round crossbars and backed by a lifetime warranty, the Stax Pro2 delivers exceptional versatility and manufacturer confidence. The proprietary stacker blocks cushion and stabilize boats without traditional J-bar pressure points, while the tool-free assembly system enables rapid installation and removal.
Value for Money:
At $64.99, this mid-priced carrier offers excellent value considering the brand reputation, lifetime warranty, and unique stacking design. Round bar compatibility alone justifies the price for many vehicle owners seeking reliable transport without changing their existing crossbars.
Strengths and Weaknesses:
Strengths include universal fit including round bars, compact folding profile, reputable brand backing, and innovative stacking stability. Weaknesses involve potentially more complex loading compared to J-bars and less familiarity with stacking systems among average users.
Bottom Line:
An outstanding option for owners of round crossbars or those seeking a proven brand with lifetime protection and space-saving design.
Why Tool-Free Installation Matters for Kayak Enthusiasts
The freedom to mount or remove your roof rack in under five minutes fundamentally changes your relationship with spontaneous adventure. Picture finishing a long workday, glancing at the glassy water conditions, and being on the road within minutes—not after spending half an hour hunting for that specific hex wrench in your garage. These systems eliminate the permanent hardware that can whistle in the wind, reduce fuel efficiency, and potentially damage your vehicle’s roof over time.
For households sharing vehicles, tool-free racks offer unprecedented flexibility. Your partner can borrow the car for groceries without looking like they’re heading to a regatta, and you can transfer the same system between your sedan and SUV depending on the weekend’s plans. The psychological barrier to getting on the water drops dramatically when the setup process becomes as simple as securing a few well-designed clamps.
Understanding Weight Capacity and Your Kayak’s Needs
Before falling in love with any mounting system, you need to crunch some critical numbers. Your kayak’s weight, combined with your roof rack’s capacity, creates the foundation of safe transport. Most recreational kayaks range from 40-70 pounds, while touring models can tip scales at 85 pounds or more. Add the weight of your rack system itself—typically 5-12 pounds for quality lightweight models—and you’re looking at a total payload that must remain comfortably below your vehicle’s roof weight limit.
Check your owner’s manual for the dynamic roof load capacity, which differs significantly from static weight limits. Dynamic capacity accounts for the forces generated at highway speeds, during braking, and when cornering. A common mistake is assuming that if the rack can hold 150 pounds stationary, it’s safe for a 70-pound kayak at 70 mph. The physics of wind shear and sudden stops can multiply forces dramatically, which is why premium tool-free systems incorporate dynamic testing ratings that often exceed static specifications by 30-40%.
Material Matters: Aluminum vs. Composite Construction
Aluminum Frames: The Gold Standard
Aircraft-grade aluminum alloys dominate the high-end tool-free market for good reason. These materials offer an exceptional strength-to-weight ratio, resist corrosion without heavy coatings, and maintain structural integrity across temperature extremes. Look for 6061-T6 or 7075-T6 specifications—these numbers indicate specific alloy compositions and tempering processes that aerospace engineers trust. The “T6” designation means the aluminum has been solution heat-treated and artificially aged, creating a molecular structure that can handle repeated stress cycles without fatigue.
Premium aluminum racks often feature anodized finishes that add a protective oxide layer through electrochemical processes. This isn’t just cosmetic; hard-anodized surfaces can be 60% harder than raw aluminum and resist scratching from sand particles that inevitably work their way into padding and contact points.
Composite Alternatives: Modern Innovations
Reinforced nylon polymers and fiberglass composites have carved out a legitimate niche in the lightweight category. These materials excel in applications where flexibility under load is actually beneficial—they can absorb vibrations that might otherwise transfer to your kayak’s hull. Advanced composites incorporate UV stabilizers that prevent brittleness after years of sun exposure, a critical feature for gear that’s constantly outdoors.
The manufacturing process matters enormously with composites. Injection-molded parts should show no visible knit lines or sink marks, which indicate poor mold design or rushed production cycles. Quality composite components feel dense and solid, not hollow or plasticky. They should flex slightly under pressure but return immediately to their original shape—a sign of proper glass fiber orientation during molding.
The Anatomy of a Quality Tool-Free Roof Rack
Cam Lever Systems Explained
The heart of any premium tool-free rack lies in its cam lever mechanism. These devices convert a small amount of hand force into massive clamping pressure through mechanical advantage ratios of 10:1 or higher. When evaluating systems, examine the cam profile—a true eccentric cam (oval-shaped) provides progressive tensioning that gets stronger as you approach the closed position, unlike simple over-center latches that maintain constant pressure.
The best designs incorporate secondary locking features that prevent accidental release from vibration. Look for spring-loaded pins or twist-lock mechanisms that require deliberate action to disengage. The lever itself should have a comfortable, ergonomic grip that you can operate with cold, wet hands—textured rubber over-molding isn’t a luxury, it’s a safety feature when you’re adjusting gear in predawn darkness.
Strap Tensioning Mechanisms
Modern tool-free racks have abandoned primitive buckle systems in favor of ratcheting cam buckles or innovative friction-drum designs. Ratchet mechanisms allow micro-adjustments in tension and provide audible clicks that confirm engagement. The gear teeth should be fine-pitched—around 8-10 teeth per inch—to prevent slippage under load while still being easy to release.
Friction-drum systems, where the strap wraps around a textured cylinder, excel in simplicity but require proper technique. The drum’s surface pattern matters: helical grooves help distribute load evenly across the strap width, preventing edge wear that leads to premature failure. Always inspect the strap exit point for smooth, radiused edges; sharp corners will saw through webbing over time, regardless of the mechanism’s quality.
Protective Padding and Contact Points
Where your rack touches your vehicle and kayak represents the highest risk for damage. Multi-density foam padding isn’t just marketing jargon—it means different zones of the pad have different firmness levels. Softer foam at the surface prevents micro-scratches to your kayak’s gel coat, while denser base layers resist compression set that would loosen the fit over time.
The gold standard involves EVA foam with a closed-cell structure that won’t absorb water or harbor mildew. Padding should be replaceable, not permanently glued, because even the best materials degrade under years of UV exposure. Quick-release pad systems use hook-and-loop backing or snap-in channels that let you swap worn sections without replacing the entire rack.
Vehicle Compatibility: What You Need to Know
Factory Rails vs. Bare Roofs
Tool-free systems approach vehicle mounting differently depending on your setup. For vehicles with factory roof rails, quality racks use adjustable clamps that grip the rail’s cross-section without requiring removal of end caps or trim pieces. The clamp jaw should articulate to match the rail’s angle—fixed-position jaws create point-loading that can deform aluminum rails over time.
Bare roof applications rely on door jamb clamp systems that create a bridge between the roof and the upper door frame. These require precise fitment to your specific vehicle profile. Premium manufacturers offer vehicle-specific fit kits with contoured pads that match your roof’s curvature. Universal systems use articulating feet with broad, soft pads that conform to various shapes but may not achieve the same level of stability.
Crossbar Requirements and Adjustments
Many tool-free kayak racks mount to existing crossbars rather than directly to the vehicle. This adds a layer of compatibility complexity. Your crossbar’s shape—oval, rectangular, aero, or round—determines which mounting hardware works. The best systems include interchangeable adapters that snap into the rack base without tools, allowing you to transfer between vehicles with different crossbar profiles.
Crossbar spread—the distance between front and rear bars—critically affects kayak stability. Most touring kayaks require 24-36 inches of spread for secure transport. Adjustable-width tool-free racks can telescope to accommodate different spreads, but check the locking mechanism’s integrity at full extension. Some designs incorporate internal detent pins that automatically click into place at common spread measurements.
Door Jamb Clamp Systems
These controversial but effective systems work by creating tension between your roof and the door frame. The key is load distribution—single-point clamps concentrate stress and can deform sheet metal, while multi-point systems spread force across a larger area. Quality designs use at least three contact points on the door frame and two on the roof, creating a stable pyramid of pressure.
Rubber-coated steel cables or straps should run through the door jamb, not over weatherstripping which can create leaks. The clamp’s tightening mechanism must allow incremental adjustment; systems that rely on “hand-tight plus a quarter turn” are too vague for consistent safety. Look for torque-limiting features that click when you’ve reached optimal tension, preventing overtightening that damages paint or misaligns doors.
Security Features to Consider
A rack you can install without tools presents an obvious theft vulnerability—if you can remove it in minutes, so can someone else. Leading manufacturers have developed clever deterrents that don’t compromise the tool-free promise. Locking cores integrated into cam levers prevent them from opening without a key, effectively immobilizing the rack on your vehicle. These aren’t impenetrable, but they transform a quick grab-and-go theft into a time-consuming operation that attracts attention.
For the kayak itself, integrated cable locks that store inside the rack frame offer protection without adding separate components to keep track of. These should thread through the kayak’s grab handles or security points and lock back into the rack base. The cable’s entry point should be reinforced with a metal ferrule to prevent thieves from simply cutting the plastic housing to release the line.
Aerodynamics and Fuel Efficiency Impact
Every pound and every inch of frontal area on your roof affects fuel consumption. Lightweight racks minimize the penalty, but design matters equally. Teardrop-shaped crossbars and streamlined uprights can reduce drag by up to 30% compared to square or round profiles. Some advanced systems feature airfoil shapes that actually generate slight downforce at speed, improving stability while reducing lift.
The ability to quickly remove your rack when not in use delivers the ultimate fuel savings—zero penalty during your daily commute. Consider how the rack breaks down for storage; models that fold flat can slide under a garage workbench, while those that maintain their shape require dedicated space. Quick-release mounting hardware lets you remove just the kayak carriers while leaving the crossbars, offering a middle ground for frequent paddlers.
Installation Best Practices for Maximum Safety
Pre-Installation Vehicle Preparation
Never mount a roof rack to a dirty vehicle. Road grime acts as an abrasive, and even microscopic particles trapped between pads and paint create swirl marks. Wash and thoroughly dry your roof, paying special attention to the door jambs if using that mounting style. Apply a paint protection film or at least a coat of quality wax to contact areas—this creates a sacrificial layer that takes the wear instead of your clear coat.
Measure your roof’s dimensions and mark ideal positions with painter’s tape before mounting. This prevents the common mistake of installing the rack off-center, which creates uneven load distribution and potential handling issues. For door jamb systems, open and close each door several times after initial placement to ensure the cable routing doesn’t interfere with latches or window mechanisms.
Step-by-Step Mounting Process
Start with the front rack section, positioning it slightly forward of your vehicle’s center of gravity—typically just ahead of the windshield’s leading edge. Engage the mounting mechanism until finger-tight, then move to the rear section. Once both are loosely positioned, place your kayak on the racks to verify spacing and alignment before final tightening. This prevents the frustration of fully securing a rack only to discover your kayak doesn’t sit properly.
Tighten cam levers in a star pattern, similar to lug nuts, to ensure even pressure distribution. For strap-tensioned systems, apply tension gradually in multiple passes rather than cranking to maximum in one go. This allows the straps to seat properly and prevents binding in the mechanism. After initial tightening, wait five minutes and recheck all tension points—nylon webbing exhibits “creep” under load, losing approximately 5% of its tension as fibers align.
Post-Installation Safety Checks
The shake test is non-negotiable: grab each rack section firmly and attempt to move it in all directions. Any play indicates insufficient tension or improper fitment. Push upward from underneath—if you can create any gap between the rack foot and your roof, it’s not secure enough for highway travel. Check that all locking mechanisms have engaged their secondary safety features.
Take a short test drive around the block before loading your kayak. Listen for whistling that indicates poor aerodynamic sealing or loose components. At low speeds, brake firmly to feel how the rack responds to forward loads. After this test, reinspect all mounting points; the dynamic forces often reveal looseness that static checks miss.
Load and Unload Techniques for Solo Paddlers
Tool-free racks shine for solo adventurers, but technique still matters. Position your vehicle with the rear facing your launch point, creating a downhill slide for loading. Place a thick towel or foam pad on your rear window or trunk lid as a slide surface—this protects both boat and vehicle while giving you a pivot point. Lift the kayak’s bow onto the rear rack, then walk to the stern and slide it forward rather than attempting a deadlift onto the roof.
For heavier boats, consider a load-assist system that integrates with your tool-free rack. These typically involve a roller or slide that temporarily extends off the rear of your vehicle, bearing the kayak’s weight during the critical transition. The best designs stow within the rack’s profile when not in use, maintaining the system’s clean aesthetic and not requiring separate installation.
Seasonal Storage and Maintenance Tips
Remove your rack during off-season months to prevent UV degradation and free up garage space. Before storage, clean all components with mild soap and water, paying special attention to cam mechanisms where salt and sand accumulate. Lubricate moving parts with dry silicone spray—not WD-40, which attracts dirt. Store straps loosely coiled, not wound tight, to prevent memory kinks that weaken the webbing.
Inspect padding annually by compressing it firmly; if it doesn’t spring back immediately, the foam has degraded and needs replacement. Check cam levers for smooth operation—any grinding indicates bearing wear. For aluminum components, look for white powdery residue that signals galvanic corrosion, often caused by contact with dissimilar metals. This requires immediate cleaning and application of anti-corrosion paste.
Common Mistakes to Avoid with Tool-Free Systems
Overloading is the cardinal sin. Just because a rack installs easily doesn’t mean it’s less robust, but many users interpret “lightweight” as “light duty.” Respect the dynamic weight rating, and remember that adding gear inside the kayak during transport increases effective weight and wind resistance. Another frequent error is mounting the rack too far forward or back, creating dangerous leverage that multiplies forces on the mounting points.
Ignoring torque specifications on cam levers leads to either inadequate clamping force or damage to your vehicle. Many users stop when the lever feels “tight enough,” but proper systems require the lever to reach a specific over-center position that may feel surprisingly firm. Conversely, forcing a lever past its designed travel point can strip the cam or crack mounting brackets.
Cost vs. Value: Investing Wisely in Your Setup
Budget tool-free racks exist, but they cut corners in ways that become apparent after months of use. Cheap cam levers develop play in their pivots, causing tension loss. Inferior padding compresses permanently, requiring constant readjustment. Expect to invest $200-400 for a quality system that will last five to ten years of regular use. This amortizes to pennies per paddle session compared to the cost of repairing a damaged kayak or vehicle roof.
Consider the total cost of ownership. Systems with replaceable wear items (pads, straps, cam components) cost more upfront but save money long-term. Check parts availability before purchasing—manufacturers that sell individual components demonstrate confidence in their design and commitment to sustainability. Factor in potential insurance implications; some providers offer discounts for using certified, lockable rack systems.
When to Choose Tool-Free Over Permanent Systems
If you paddle weekly year-round, a permanent rack might justify its constant presence. But for the majority who paddle seasonally or less frequently, tool-free systems offer compelling advantages beyond mere convenience. They preserve your vehicle’s resale value by avoiding drilled holes or permanent marks. They allow you to adapt to different kayak sizes—perhaps you start with a 10-foot recreational boat but upgrade to an 18-foot sea kayak; adjustable tool-free systems accommodate this evolution.
Consider your parking situation. Garages with low clearance become non-issues when you can remove the rack in moments. Urban paddlers who street-park appreciate removing expensive-looking gear that might tempt thieves. The environmental impact is smaller too—manufacturing one versatile tool-free rack consumes fewer resources than producing multiple permanent systems for different vehicles over your paddling lifetime.
Frequently Asked Questions
How do I know if a tool-free rack will fit my specific vehicle?
Check the manufacturer’s vehicle fit guide, which should list your make, model, and year with specific mounting requirements. For universal systems, measure your door jamb depth and roof curvature, then compare these to the rack’s adjustment range. When in doubt, contact the manufacturer with photos of your roof setup—they can confirm compatibility before you purchase.
Can tool-free racks really be as secure as bolted systems?
Yes, when properly designed and installed. Quality cam levers generate clamping forces exceeding 200 pounds per foot, comparable to properly torqued bolts. The key is mechanical advantage and proper technique. Independent testing shows premium tool-free systems withstand pull-off forces within 10% of permanent racks, with the added benefit that users are more likely to achieve proper installation without specialized tools.
Will installing and removing the rack damage my door frames or roof?
Properly designed systems distribute load across multiple contact points with soft, contoured pads. Damage occurs from overtightening or using racks on incompatible vehicles. Follow torque specifications exactly, and never install a rack designed for a different vehicle type. Inspect paint periodically under pad locations; any dimpling or cracking indicates immediate removal and reassessment.
How often should I check the rack tension during a road trip?
Perform a visual inspection and shake test at every fuel stop for the first 200 miles of a trip. After initial settling, check at each major rest stop. Straps and cam systems can relax as vibrations cause fibers to align and components to seat. A two-minute check prevents catastrophic failure 50 miles from anywhere. Pay special attention after driving on rough roads or in high winds.
Can I leave my tool-free rack installed all summer?
You can, but you’ll sacrifice fuel economy and increase wear. UV exposure degrades padding and straps even when the rack is empty. If you paddle weekly, consider removing just the upright kayak supports while leaving crossbars in place. This compromise maintains some convenience while reducing drag and exposure. Always use rack covers or UV protectant spray on exposed components.
What’s the maximum speed I should drive with a kayak on a tool-free rack?
Follow the rack manufacturer’s rating, typically 70-80 mph. However, your kayak’s profile matters more than the rack’s rating. Long, flat-bottomed recreational kayaks generate significant lift at speed. Reduce speed in crosswinds, and never exceed 65 mph when transporting two boats or a kayak with gear inside. The rack might hold, but aerodynamic forces can make your vehicle unstable.
How do I prevent theft of my kayak when using a tool-free system?
Use integrated cable locks through the kayak’s security points, and engage any locking mechanisms on the rack itself. For overnight stops, run a secondary cable through the kayak and around your roof rails or door frames. Remove expensive accessories like GPS units and fishing gear. Park strategically—thieves avoid well-lit, high-traffic areas. Consider a motion alarm that attaches to the kayak and sounds if the boat is moved.
Are foam block systems considered tool-free racks?
Technically yes, but they’re a different category. Foam blocks strap through your doors and rest directly on the roof, offering ultimate simplicity but minimal security and no theft deterrence. They’re best for short trips with light boats, not regular highway travel. True tool-free racks are structural systems that maintain positive clamping force independent of the kayak’s presence.
Can I mount a tool-free rack on a vehicle with a panoramic sunroof?
Most manufacturers advise against it. The glass lacks the structural support of sheet metal, and clamping forces can crack the pane or damage the seal mechanism. If you must transport on such a vehicle, position the rack to avoid the glass entirely, which often means a narrower spread than ideal. Some vehicles have reinforcement zones marked in the owner’s manual—never exceed these locations.
How long should a quality tool-free kayak rack last?
With proper care, expect 5-7 years of regular seasonal use. Commercial users might see 3-4 years before major component replacement. The rack’s frame should last indefinitely, but plan on replacing straps every 2-3 years, pads every 3-4 years, and cam lever springs every 5 years. Saltwater users should halve these intervals. Keep spare straps in your paddling kit—they’re the most likely failure point and inexpensive insurance against a ruined trip.'