Picture this: you’re three miles into a winter trail run, the powder suddenly gives way to a steep, icy incline, and your lightweight running shoes are about as useful as roller skates on a glacier. This is the moment that separates prepared adventurers from those who turn back—or worse, risk a dangerous slide. Packable snowshoe crampons that slip into your jacket pocket aren’t just another gear obsession; they’re the ultimate insurance policy for unpredictable winter terrain. These micro-traction devices have revolutionized how we approach transitional snow travel, offering legitimate ice-gripping power in a package smaller than your smartphone.
The evolution of packable traction has been nothing short of remarkable. We’ve moved from bulky, pound-plus crampons that required dedicated pack space to sophisticated engineering marvels that disappear into a chest pocket. But with this explosion of options comes a critical need to understand what actually works versus what’s just clever marketing. Let’s dive deep into the world of pocket-sized traction and unpack everything you need to know before investing in these winter essentials.
Top 10 Snowshoe Crampons That Fit in Jacket Pockets
Detailed Product Reviews
1. Ice Snow Traction Cleats Crampons Anti-Slip Snow Shoes Cleats Walking on Snow and Ice Winter Walking Boots Cleats for Men Women Hiking, Jogging (24 Steel Crampons,Szie L)
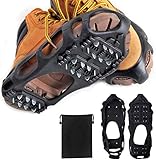
Overview: These traction cleats offer 24 steel crampons for confident winter walking. Designed for men and women, they stretch over boots or shoes for hiking, jogging, or daily errands. The thermoplastic elastomer construction provides flexibility while maintaining durability across various activities from ice fishing to snow shoveling.
What Makes It Stand Out: The 24-point coverage exceeds many competitors, delivering comprehensive grip across heel and forefoot. Unlike basic models with fewer contact points, these distribute weight evenly for stable strides. The full-foot design prevents pressure points, while the stretchable material accommodates various footwear without complex sizing charts.
Value for Money: At $17.89, these sit in the sweet spot between flimsy budget options and overpriced premium gear. You’re getting double the spikes of entry-level cleats without paying for mountaineering-grade materials. For occasional use on icy sidewalks and light trails, this price delivers reliable safety without breaking the bank.
Strengths and Weaknesses: Pros: Excellent spike density for the price; easy slip-on design; versatile for multiple activities; lightweight enough for all-day wear.
Cons: Steel quality unspecified; no stated temperature rating; “Szie L” typo suggests potential quality control issues; lacks adjustment straps for extremely bulky boots.
Bottom Line: Ideal for urban commuters and casual hikers who encounter moderate winter conditions. While not built for extreme expeditions, these cleats provide dependable traction for everyday icy surfaces. Consider these if you need reliable grip without investing in professional-grade equipment.
2. Ice Cleats for Shoes and Boots, 19 Stainless Steel Spikes Crampons, Anti-Slip Snow Shoes Microspikes for Hiking, Climbing Gear, Ice Fishing Gear, Boot Chains for Winter Walking, M(35-39), Black

Overview: These professional-grade crampons feature 19 manganese steel spikes connected by stainless steel chains, engineered for serious winter adventurers. The TPE harness withstands temperatures down to -49°F, making them suitable for extreme environments from ice fishing to mountaineering. The adjustable straps ensure secure fit during aggressive activities.
What Makes It Stand Out: The combination of manganese steel spikes and chain-link design provides superior bite on varied terrain. Unlike molded spike patterns, the flexible chains adapt to uneven surfaces for continuous contact. The adjustable hook-and-loop straps ensure a secure fit that won’t shift during aggressive climbs or runs, while the included carry bag enables convenient transport.
Value for Money: At $20.99, these dramatically undercut premium brands while offering comparable performance. The included carry bag and sub-0.5kg weight add travel convenience. You’re getting expedition-worthy materials and thoughtful design at a price point that competes with basic recreational models, making them exceptional value.
Strengths and Weaknesses: Pros: Exceptional cold-weather rating; secure strap system; chain design grips uneven terrain; portable with storage bag; suitable for technical activities.
Cons: Medium size only limits immediate availability; 19 spikes offer less coverage than some 24+ models; stainless chains may add minimal weight compared to pure TPE designs.
Bottom Line: Outstanding choice for dedicated outdoor enthusiasts who refuse to let winter limit their adventures. The robust construction and extreme temperature tolerance make these worth every penny. Size availability is the only limitation—grab these if they fit your footwear.
3. Universal 5-Tooth Ice Cleats for Shoes Boots, Non-Slip Gripper Spikes Ice Traction Cleats, Winter Outdoor Anti-Skid Shoe Covers Crampon, Snow Shoes Spikes for Walking Fishing Hiking (1, Black)

Overview: These minimalist 5-tooth cleats provide essential traction at an unbeatable price point. Constructed from flexible silicone with manganese steel studs, they slip over any footwear for instant grip on icy surfaces. Designed as a universal solution for light winter conditions, they prioritize affordability and portability over heavy-duty performance.
What Makes It Stand Out: The five-spike configuration focuses pressure for effective penetration on thin ice while maintaining natural foot flex. The silicone base offers superior stretch and cold resistance compared to cheaper rubber alternatives. At this price, they function as disposable emergency gear you can keep in multiple locations without financial concern.
Value for Money: At $5.99, these cost less than a coffee and pastry. They’re not competing with $30+ professional crampons—they’re an accessibility solution for anyone needing basic winter safety. Perfect for glove boxes, office drawers, or as backup pairs when primary cleats are misplaced, they eliminate cost barriers to winter traction.
Strengths and Weaknesses: Pros: Extremely affordable; lightweight and portable; universal fit eliminates sizing guesswork; adequate for light ice and packed snow; silicone durability exceeds expectations.
Cons: Only five spikes provide limited coverage; inadequate for deep snow or steep terrain; silicone may degrade faster than TPE; minimal ankle support; not suitable for heavy-duty use.
Bottom Line: Best purchased as secondary or emergency traction rather than primary winter gear. They deliver surprising value for casual walks on icy sidewalks but won’t replace proper crampons for serious hiking. Buy several pairs and stash them everywhere—you’ll be grateful when unexpected ice appears.
Understanding Packable Snowshoe Crampons
What Makes Them “Packable”?
Packability isn’t just about being small—it’s about intelligent design that prioritizes compression without sacrificing structural integrity. True packable crampons feature folding or rolling designs that collapse their footprint by 60-80%. The frame typically uses segmented plates that hinge at specific points, allowing the device to wrap around itself or flatten into a low-profile shape. The most advanced models incorporate memory in the connecting cables or chains that naturally want to return to their packed state, making them easier to stuff into tight spaces without wrestling with recalcitrant springs.
The Jacket Pocket Standard
When we say “jacket pocket,” we’re not talking about bulky parka pouches. The benchmark is a standard chest pocket on a technical softshell—roughly 6" x 8" x 1.5". Premium packable crampons achieve this by keeping packed dimensions under 5" x 6" x 1" and weighing less than 12 ounces. Anything bulkier technically fits, but creates an awkward bulge that interferes with pack straps and arm movement. The holy grail models compress to the size of a large orange and weigh under 8 ounces, making them truly forgettable until you need them desperately.
Why Go Ultra-Packable?
The “Just in Case” Advantage
Winter conditions change hourly. That sun-crusted slope at 9 AM becomes a bulletproof ice sheet by 2 PM. Ultra-packable crampons live in your pocket, not your pack, which means they’re accessible without stopping to dig through layers of gear. This accessibility fundamentally changes your decision-making calculus. Instead of pushing through sketchy terrain because stopping is inconvenient, you can deploy traction in under 30 seconds. The psychological safety net is equally valuable—knowing you have a solution literally close at hand reduces anxiety and allows you to focus on movement and route-finding.
Weight Savings for Fast-and-Light Missions
For ski mountaineers and trail runners, every ounce matters. Traditional approach crampons add 1.5-2 pounds to your kit. The lightest packable versions slash that to under half a pound, a 75% weight reduction that directly translates to faster travel and less fatigue. But there’s a more nuanced benefit: weight distribution. Pocket-stored crampons keep the mass centered on your torso rather than bouncing in a pack, improving balance and reducing the pendulum effect that can throw off your center of gravity during technical moves.
Key Features to Evaluate
Material Science: Aluminum vs. Steel vs. Titanium
The material choice defines your crampon’s personality. Aluminum alloys (typically 7075-T6) dominate the ultralight category, offering excellent corrosion resistance and weight savings but wearing down quickly on rocky approaches. Expect 30-50 miles of pure ice use before points dull significantly. Steel—usually chromoly or stainless—provides superior durability and edge-holding, adding 4-6 ounces but lasting 3-4 times longer. The dark horse is titanium: half the weight of steel with comparable strength, but at a steep price premium and with tricky welding characteristics that can create failure points if not manufactured perfectly. For pocket crampons, heat-treated stainless steel often provides the best durability-to-weight ratio for most users.
Point Configuration and Geometry
Don’t just count points—study their layout. Ten points is standard, but their placement determines performance. Look for forward-facing front points that extend slightly beyond your toe box for kick-stepping. Side points should align with your boot’s edges for lateral security on traverses. The most sophisticated designs use variable-length points: longer at the toe and heel for penetration, shorter at the balls of your feet for stability. Point angle matters too—12-15 degrees of downward tilt optimizes penetration without excessive calf strain. Some models feature replaceable front points, a worthwhile feature if you regularly encounter mixed terrain.
Binding Systems for Quick Deployment
The binding separates frustration from function. Elastomer harnesses (rubber “webs”) offer the fastest on-off, stretching over most boots in seconds but providing less precise fit. They also become brittle below -10°F. Hybrid systems use a toe bail with a heel lever—more secure but requiring specific boot compatibility. The sweet spot for packable models is a micro-adjustable cable system that tightens with a single pull, works with everything from trail runners to mountaineering boots, and folds flat with the crampon. Avoid anything requiring tools or multi-step threading; you’ll be attaching these in cold, windy conditions with gloved hands.
Sizing and Fit Considerations
Footwear Compatibility
Your crampons must match your intended footwear, not just in size but in flex. Ultra-packable models designed for trail runners use flexible plates that move with your shoe’s natural bend. Trying to pair these with rigid mountaineering boots creates a dangerous disconnect where the crampon can shift independently. Conversely, stiff “mountaineering-lite” crampons on running shoes force unnatural foot mechanics and increase rollover risk. Check the manufacturer’s flex rating: “soft” for running shoes and flexible hikers, “semi-rigid” for stiff hiking boots, and “rigid” only for dedicated mountaineering boots.
Adjustable vs. Fixed Sizing
Fixed-length crampons save weight and complexity but offer limited versatility. Most packable models use a telescoping center bar that adjusts 3-4 sizes, accommodating boots from women’s 6 to men’s 12. The adjustment mechanism is critical—look for spring-loaded pins that lock positively into place with an audible click. Screw-based adjustments can vibrate loose during travel. Some innovative designs use a notched sliding plate that eliminates moving parts entirely, though these may develop play over time. For pocket crampons, a well-engineered adjustable model typically adds only 1-2 ounces over fixed-length versions.
Weight and Packability Tradeoffs
The Ounce-Counting Game
There’s a point of diminishing returns in the weight game. Models under 6 ounces often sacrifice point length or use thinner gauge materials that flex under load. The performance cliff typically appears around 5 ounces—below this, you’re essentially wearing heavy-duty microspikes, not true crampons. The optimal range for functional packable crampons is 7-11 ounces. This provides enough material for 3/4-inch points and a robust frame without crossing into “too heavy for a pocket” territory. Remember to factor in binding weight; some manufacturers quote frame-only numbers that are misleadingly low.
Foldability vs. Rolling Systems
Two philosophies dominate packable design. Folding systems use hinge points that allow the crampon to collapse like a taco, creating a rigid but compact package that slides easily into pockets. Rolling systems use flexible chains or cables that allow the entire unit to curl into a ball, achieving smaller pack size but requiring more careful stuffing to avoid tangles. Folding systems generally offer better rigidity when deployed, while rolling systems pack smaller and conform better to irregular pocket shapes. For jacket storage, rolling designs often win—they can be crammed into overstuffed pockets without creating pressure points.
Traction Technology Deep Dive
Front Points and Toe Crampons
The front points are your primary tools for steep, direct climbing. On packable models, these are typically 1/2 to 3/4 inch long—shorter than technical climbing crampons but sufficient for 45-degree ice and hard snow. Look for horizontally oriented points rather than vertical; they provide better purchase on neve and are less likely to shear. Some designs incorporate a secondary “mono-point” configuration where the two front points merge into a single, centered spike for precise footwork on mixed terrain. This is overkill for most users but valuable for technical ski mountaineering.
Heel Spikes and Side Rails
Heel spikes prevent the terrifying backward slide, especially during descents. Effective packable crampons position these directly under your calcaneus, not too far back where they become lever arms. Side rails or “antibot” plates serve dual purposes: they provide lateral stability on traverses and prevent snow from balling up underfoot. The best designs use a slight upward curve at the edges—this sheds snow while still biting into ice when you roll your ankle. Avoid crampons with flat side rails; they’re snowball magnets in wet conditions.
Anti-Balling Plates
Snowballing underfoot transforms your crampons into slick, useless platforms. Anti-balling plates are non-negotiable for serious winter travel. These hydrophobic pads (usually ABS plastic or rubber) sit between the crampon frame and your boot sole, preventing snow adhesion. On packable models, these plates must be flexible enough to fold or roll with the frame. The most effective versions use a dimpled surface that creates air pockets, reducing suction. Some ultralight models omit these to save weight—a dangerous corner cut that renders them useless in temperatures hovering around freezing.
Deployment Speed and Ease of Use
Glove-Friendly Operation
You’ll never attach these with bare hands in real conditions. Test the binding system with heavy winter gloves—can you locate all adjustment points by feel? Are there tiny buckles or recessed buttons? The best systems use large, textured pull tabs and audible clicks to confirm engagement. Some models even color-code the left and right crampons with bright tabs visible in peripheral vision. Practice your deployment at home until you can do it blindfolded; muscle memory is critical when you’re perched on a sketchy slope with wind whipping at your face.
One-Handed Attachment Systems
The gold standard is a binding you can secure with one hand while balancing on the other foot. This typically involves a toe basket that holds the crampon in place while you pull a heel lever or cinch a strap. Spring-loaded heel cables that snap into place automatically are emerging in high-end models. Avoid systems requiring you to hold the crampon in position while simultaneously threading straps—this becomes a circus act on steep terrain. The most elegant solutions use gravity: set your toe, stomp down, and the heel locks automatically.
Durability in Extreme Conditions
Wear Patterns and Longevity
Packable crampons face an inherent durability challenge: thinner materials and moving parts create failure points. Pay attention to wear indicators—some manufacturers embed small dots on points that disappear when they’ve worn to unsafe levels. The hinge points on folding models are particularly vulnerable; inspect them regularly for stress cracks. A well-maintained steel pair should last 200+ miles of pure ice travel. Aluminum versions might need replacement after 80-100 miles of rocky, mixed terrain. Keep a log of your usage—most failures are predictable if you track mileage and conditions.
Corrosion Resistance
Winter travel means constant moisture, road salt, and freeze-thaw cycles. Stainless steel offers the best corrosion resistance but adds weight. Aluminum anodizing helps, but scratches expose bare metal that oxidizes rapidly. The real weak link is often the connecting hardware—tiny springs and screws that rust first. Look for models using titanium or coated stainless hardware. After each trip, rinse with fresh water and dry thoroughly. Some ultralight fanatics store their crampons with silica gel packets to absorb residual moisture—a trick worth adopting for gear that lives in your pocket.
Safety and Performance Standards
CE Certification and Ratings
True crampons (not microspikes) should carry CE certification, typically EN 893 for mountaineering equipment. This ensures they’ve been tested for strength, point sharpness, and binding security. The certification includes a “C” rating: C1 for flexible boots, C2 for semi-rigid, C3 for rigid. Most packable models are C1 or C1/C2 hybrid rated. Be wary of products marketed as “crampons” that lack CE marking—they’re often just aggressive microspikes. The certification also includes a “T” rating for technical climbing, which most packable models won’t have—understand this limitation before tackling water ice.
When Packable Isn’t Enough
Recognize the limitations. Packable crampons excel on snow slopes up to 50 degrees and water ice up to WI2. Beyond that, you need full-weight technical crampons with longer, more aggressive points. Also consider consequences: if a fall means serious injury, don’t trust your life to 8-ounce pocket crampons. They’re backup tools, not primary protection for extreme objectives. The rule of thumb: if you’re planning to need crampons, bring real ones. If you might need them, packable versions are perfect. This distinction saves lives.
Real-World Use Cases
Trail Running Transitions
For runners, the key is seamless integration with your vest or pack system. The crampons must fit in a chest pocket accessible without removing your vest. Look for models with a soft case or built-in stuff sack to prevent points from punching through pocket fabric. Many runners carry them in a waterproof zip-lock to keep other gear dry. The ideal runner’s crampon deploys in under 20 seconds and adds less than 10 seconds per mile when not in use. Practice transitions until they’re automatic—your race time depends on it.
Backcountry Skiing and Splitboarding
Skiers face unique challenges: boot compatibility with both ski and walk modes, and the need to transition without removing skis. The best packable crampons for skiing feature a toe bail that works with tech binding toe pieces and a heel lever that clears ski/walk mechanisms. Some models allow attachment while skis remain on your pack—a game-changer for steep bootpacks. Consider how the crampons store with your skis: can they fit in your jacket while your pack carries your skis? This configuration is common in technical ski mountaineering where every gram on your back matters.
Alpine Climbing Approaches
Approach shoes with pocket crampons have replaced heavy mountaineering boots for many alpine routes. The system works best when your approach involves mostly dry trail with short sections of snow or ice. The crampons must interface cleanly with approach shoe soles that are often more rockered than hiking boots. Look for flexible frames that don’t create pressure points on soft shoes. The binding should distribute load evenly to prevent the crampon from folding the shoe sole. Test the setup on low-consequence terrain first—approach shoe flex can cause unexpected crampon behavior on steep ice.
Maintenance and Longevity
Post-Trip Cleaning Protocol
Never store crampons wet. The pocket environment is warm and humid—perfect for corrosion. After each use, brush off snow and ice with a soft brush (an old toothbrush works). Rinse in warm water to dissolve salt and grime, then shake dry. For aluminum models, a light coat of WD-40 on points prevents oxidation. Steel benefits from a thin film of gun oil. Pay special attention to the binding mechanism; work it through its full range of motion while drying to prevent freezing. Store them in the deployed position—keeping them folded stresses the hinges long-term.
Storage Best Practices
Your jacket pocket is for transport, not long-term storage. At home, hang crampons by their heel loops in a dry, cool place. Avoid keeping them in stuff sacks where moisture can accumulate. If you must store them folded, place a small piece of cloth between hinged sections to prevent metal-on-metal contact. For seasonal storage, apply a corrosion inhibitor and place them in a breathable canvas bag, not plastic. Check them monthly during off-season for rust spots; catch corrosion early and it’s just surface blemishes, catch it late and you’re buying new gear.
Sharpening and Repair
Dull points are dangerous—they slip more and require more force to penetrate. Sharpen with a fine metal file, maintaining the original bevel angle (usually 45 degrees). Never use a grinding wheel—it removes too much material and overheats the metal, weakening it. File only the bottom and sides of points, never the top, which would shorten them. For aluminum, a diamond file works best. Carry a small file in your repair kit for field touch-ups. If a point bends, replace the entire crampon—bent points indicate metal fatigue and will break catastrophically. Most manufacturers sell replacement anti-balling plates; replace these when they crack or delaminate.
Price vs. Performance Analysis
Budget-Friendly Options
Entry-level packable crampons ($40-70) typically use basic aluminum and simple elastomer bindings. They work fine for occasional use on moderate terrain but expect 1-2 seasons of regular use. The compromises are usually in hardware quality—cheaper springs, thinner gauge metal, and less precise manufacturing tolerances. For hikers who encounter ice a few times per year, these represent solid value. The key is honest assessment of your needs: if you’re not pushing technical terrain, you don’t need premium features.
Premium Ultralight Models
High-end crampons ($120-180) justify their cost through materials and engineering. Titanium hardware, precision-machined adjustment mechanisms, and advanced anti-balling systems add up. These models often include features like modular front points and field-replaceable parts. For dedicated alpinists and ski mountaineers who use them weekly, the durability and performance gains amortize quickly. A $150 crampon that lasts 5 seasons costs less per-use than a $60 pair that needs replacement every year. The weight savings also have value—every ounce saved is an ounce of energy preserved for the summit push.
Value Sweet Spots
The $80-100 range often hits the performance-value bullseye. These crampons use mid-tier aluminum or steel with well-engineered bindings and solid warranties. They lack the exotic materials of premium models but don’t cut critical corners. Many include features like dual-density anti-balling plates and micro-adjustable heel levers. For the majority of backcountry travelers who need reliable traction 10-20 days per year, this is the smart money zone. The durability is sufficient for multi-year use, and the performance is indistinguishable from premium models on all but the most technical terrain.
Common Buying Mistakes
Oversizing for “Better” Traction
Bigger isn’t better with packable crampons. Oversized frames flex independently of your boot, creating a sloppy, unpredictable feel. They also increase pack size and weight. Many buyers size up thinking they’ll fit over bulkier boots “just in case,” but this compromises security on the boots they’ll actually use. Buy for your primary footwear. If you need to accommodate multiple boot types, choose an adjustable model with a wide range, not a larger size. A properly fitted crampon should extend no more than 1/2 inch beyond your boot’s perimeter.
Ignoring Boot Compatibility
That slick pair of pocket crampons won’t help if they don’t fit your boots. Check the toe and heel welt compatibility—some bindings require a specific lip or groove to engage. Trail running shoes often lack welts entirely, requiring a wrap-around elastomer system. Mountaineering boots may have automatic welts that only work with step-in bindings. Bring your actual boots when shopping (or measure them meticulously). Online, study the manufacturer’s compatibility charts and read user reviews from people with your specific boot model. A 5-minute compatibility check prevents a dangerous surprise on the mountain.
Choosing Style Over Substance
Don’t be seduced by ultralight specs alone. That 5-ounce titanium model looks appealing until you realize the points are too short for real ice and the binding fails in cold temps. Focus on proven performance metrics: point length, binding security, and material durability. Read reviews from users in conditions similar to yours. A slightly heavier, more robust crampon you trust is infinitely more valuable than the world’s lightest model that makes you nervous. The best gear disappears until you need it, then performs flawlessly without drama.
Making Your Final Decision
The 5-Step Selection Framework
First, define your primary use case and risk tolerance. A trail runner’s needs differ radically from a ski mountaineer’s. Second, list your compatible footwear and measure precisely. Third, set a realistic weight/pack size budget based on how often you’ll carry them vs. use them. Fourth, prioritize features: binding type, point configuration, and anti-balling plates are non-negotiable. Fifth, read long-term reviews focusing on durability and failure modes. This systematic approach prevents emotional purchases and ensures you get crampons that match your actual needs, not your aspirational ones.
Testing Before Committing
Whenever possible, test in-store on a simulated surface. Many specialty retailers have ice boards or inclined planes for this purpose. Feel how the crampon flexes with your boot. Practice putting them on while wearing gloves. If buying online, purchase from retailers with generous return policies and immediately test them at home on a safe, icy surface (your driveway after a freeze works). Check for pressure points, binding slippage, and noise (creaking often indicates poor fit). Return anything that feels off—your instincts are usually right. Once you commit, take them on a low-consequence shakedown trip before the real mission.
Frequently Asked Questions
How do I know if my jacket pockets are large enough for packable crampons?
Measure your pocket’s interior dimensions and compare them to the crampon’s packed specs, but also consider the pocket’s material and placement. A 6" x 8" pocket sounds adequate, but if it’s on a tight-fitting softshell, stuffing a rigid folded crampon may restrict movement. Test with a similarly sized object like a large orange or rolled-up beanie. Also check for pocket reinforcement—crampon points can wear through lightweight mesh pockets. Many users opt for a small stuff sack or wrap crampons in a bandana to protect both pocket and gear.
Can packable crampons really replace full-size models for technical climbs?
No, and believing they can is dangerous. Packable crampons are emergency tools and approach aids, not primary protection for technical ice or mixed climbing. Their shorter points, flexible frames, and lighter bindings can’t handle sustained vertical ice or hard mixed routes. Use them for their intended purpose: short, steep sections on approaches, unexpected icy patches, and as backup insurance. For any climb where a fall would be catastrophic, bring full-weight technical crampons. Think of packable models as your spare tire—perfect for getting you home, but you wouldn’t drive cross-country on them.
What’s the lifespan difference between aluminum and steel packable crampons?
Under pure ice and snow conditions, quality steel crampons last 3-4 times longer than aluminum. A steel pair might endure 200-300 miles of hard use before points become dangerously dull, while aluminum typically needs replacement after 60-100 miles. However, this changes dramatically on mixed terrain. Rocky approaches can reduce aluminum lifespan to 30-50 miles, while steel might still last 150 miles. For occasional weekend warriors, aluminum often provides 2-3 seasons of use. For regular users or those encountering rock, steel’s durability justifies its weight penalty and higher cost.
Are there any safety certifications I should look for?
Yes. Legitimate crampons should carry CE marking under EN 893 (mountaineering equipment) or EN 14059 (crampons specifically). This ensures they’ve passed standardized tests for strength, point geometry, and binding retention. Additionally, check for UIAA certification, which involves more rigorous field testing. Be extremely cautious of products marketed as “traction devices” or “snowshoe accessories” that lack these certifications—they haven’t been vetted for safety. The certification should be physically molded into the crampon frame or printed on a permanent tag, not just mentioned in marketing materials.
How do I prevent crampons from damaging my jacket pockets?
Always use a protective case or wrap. Many crampons come with a simple fabric stuff sack—use it. If not, a heavy-duty zip-lock bag or purpose-built crampon pouch prevents punctures. Remove any snow or ice before pocketing; melting moisture soaks the fabric and can refreeze, creating a wet spot that leads to hypothermia. Position points facing inward toward your body, not outward where they stress pocket seams. For long-term pocket storage, consider adding a layer of duct tape to high-stress areas inside the pocket as reinforcement. Better yet, dedicate a specific pocket and reinforce it with Tenacious Tape.
Can I use packable crampons with trail running shoes?
Yes, but with critical caveats. Choose models specifically designed for flexible footwear—typically those with full elastomer harnesses or highly articulated frames. The crampon must move with your shoe’s natural flex without creating pressure points. Check that the binding doesn’t compress the shoe’s upper excessively, which can cause numbness or restrict blood flow. Test extensively on similar terrain before committing to a race or long mission. And understand the limitations: you lose the rigid boot’s support, so keep terrain angles moderate. Many trail runners carry them for short, icy sections rather than sustained climbing.
What’s the best way to test crampon fit before buying?
Bring your actual footwear to the store and try them on. Walk around, flex your foot, simulate kicking steps on a wall. The crampon shouldn’t shift or create hot spots. If shopping online, order multiple sizes and return the losers. At home, test on a carpeted incline or your stairs—does the binding hold when you weight the toe? Can you walk naturally without the crampon feeling like a separate entity? A proper fit feels like an extension of your boot, not an awkward add-on. Pay attention to heel lift; any slippage here will be magnified on steep terrain.
Do anti-balling plates really make a difference on packable models?
Absolutely. Snowballing is the number one performance killer in temperatures near freezing. Without anti-balling plates, wet snow compacts under your boot and lifts the points off the surface, rendering them useless. On packable models, these plates are even more critical because the lighter weight and flexible design make them more susceptible to snow buildup. The difference between models with and without plates is night and day—it’s the difference between secure footing and terrifying skating. Never buy packable crampons without them, regardless of how light the alternative seems.
How should I clean and maintain crampons that live in my pocket?
Pocket storage means more moisture exposure from body heat and sweat. After each use, rinse with warm water and dry completely—preferably with a hairdryer on low to ensure no moisture hides in crevices. Lubricate moving parts with a dry silicone spray, not oil-based products that attract dirt. Inspect bindings weekly during season for cracks or wear. Store them in the open position to reduce stress on hinges. Because they live in your pocket, they’re exposed to more salt and grime than pack-stored gear, so monthly deep cleans with a mild detergent are wise. Consider keeping a small maintenance kit in your vehicle.
Are replaceable parts worth the extra cost on pocket crampons?
For most users, no. The weight and complexity of replaceable points negate the packability benefits. However, two exceptions exist: if you regularly damage front points on rock (consider a replaceable front section), or if you’re traveling remotely for extended periods where gear failure isn’t an option. In those cases, carrying spare parts makes sense. For the average weekend warrior, it’s better to buy a new pair every few seasons as technology improves. The exception is anti-balling plates—these should be replaceable and cost less than $15, as they wear out faster than the frame.'