There’s nothing quite like the primal thrill of waking up to paw prints circling your campsite—until you realize those prints are fresh and your food supply is now a bear’s midnight snack. In bear country, your hiking backpack isn’t just gear; it’s a critical component of a safety system that protects both you and the wildlife whose territory you’re traversing. The marriage of a properly designed hiking backpack and a certified bear-proof food container has become the gold standard for responsible backcountry travel, yet many hikers still struggle with the practical realities of integrating these two essential pieces of equipment.
This comprehensive guide cuts through the confusion, offering expert-level insights into selecting, packing, and using hiking backpacks specifically designed to accommodate bear-proof food containers. Whether you’re planning a weekend jaunt in Yosemite or a two-week expedition through the Bob Marshall Wilderness Complex, understanding the nuanced relationship between your pack and your food storage system will transform your wilderness experience from anxious to assured. We’ll explore everything from certification standards and weight distribution physics to the subtle design features that separate a bear-canister-friendly backpack from a frustrating wrestling match in the backcountry.
Top 10 Hiking Backpacks with Bear-Proof Food Containers
Detailed Product Reviews
1. BearVault BV500 Journey Bear Resistant Food Container - Extra Large
Overview: The BearVault BV500 Journey is the gold standard for extended backpacking trips requiring certified bear-resistant food storage. With capacity for 7+ days of food, this transparent canister balances impressive volume with reasonable weight for ultralight enthusiasts. At $94.95, it represents a premium investment that has protected countless backpackers across millions of wilderness miles.
What Makes It Stand Out: Clear polycarbonate sides let you instantly locate food without unpacking everything. The tool-free lid opens effortlessly without coins or screwdrivers, while integrated strap guides and rounded corners make packing simple. Dual IGBC and SIBBG certifications confirm it has survived actual grizzly and black bear attacks. It cleverly doubles as a camp stool, adding function without extra weight.
Value for Money: While expensive upfront, the BV500 delivers exceptional value for serious adventurers. Universal approval across all National Parks and Forests eliminates compliance worries. For thru-hikers or frequent users, cost-per-trip becomes negligible compared to renting ($5-10/trip). Its durability ensures years of reliable service, making it cheaper long-term than replacing inferior containers.
Strengths and Weaknesses: Strengths include massive capacity, full transparency, proven certifications, and multifunctional utility. The wide mouth simplifies packing. Weaknesses: the $95 price stings for casual campers, and its bulky 700 cubic inch capacity is overkill for short trips. Some users find the lid can be tricky with cold fingers.
Bottom Line: For multi-day adventures where canisters are mandatory, the BV500 is worth every penny. Its thoughtful design and proven protection make it the top choice for committed backpackers prioritizing food security and convenience.
2. JIUSAIRUI Odor Proof Bear Bags for Food Backpacking: 3Pack Reusable Bear Proof Food Storage Designed to Use with Bear Canister for Backpacking fit Camping Hiking Water Sports

Overview: The JIUSAIRUI Odor Proof Bags provide an ultralight, budget-friendly approach to scent control and waterproofing, with three bags for $8.99. While marketed as “bear proof,” these are NOT certified bear-resistant containers and cannot legally replace required canisters in regulated wilderness areas. Understanding their actual purpose is critical.
What Makes It Stand Out: These bags deliver exceptional waterproof performance, tested to 200 feet of submersion—ideal for kayaking or river crossings. The double-seal closure contains odors from toiletries and trash, reducing attraction from rodents and raccoons. Weighing mere grams, they supplement primary food protection without bulk. Their reusable, washable construction supports eco-friendly practices.
Value for Money: At $3 per bag, value is excellent for waterproof storage and odor reduction. However, the “bear proof” marketing is misleading and potentially dangerous. They shine as accessories to certified canisters or in regions without bear canister mandates. As standalone bear protection, they’re worthless and could invite fines or dangerous encounters.
Strengths and Weaknesses: Strengths: outstanding waterproofing, negligible weight, reusability, versatility, and unbeatable price. Weaknesses: NOT bear-resistant despite claims, zero regulatory approval, provides false security, thin material vulnerable to punctures, and ethically questionable marketing that endangers users.
Bottom Line: Purchase these as waterproof, scent-containment accessories to complement a certified canister, never as a replacement. They’re perfect for organizing toiletries or electronics while minimizing odors. For actual bear country requiring canisters, invest in approved hard-sided containers. Use these wisely for their real strengths.
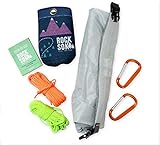
3. Tough Bison Bear Bag Hanging Kit - 10L Waterproof Bear Proof Food Storage Bag, 2 Straps, Rock Sack & 2 Ropes with 4 Safety Clips for Hiking, Kayaking, Camping, Outdoor Adventures

Overview: The Tough Bison Hanging Kit provides a traditional food-hanging solution in a complete $21.99 package. Designed for backpackers preferring hanging methods over hard-sided canisters, this 10L waterproof bag includes all necessary components: two straps, a rock sack, two ropes, and four safety clips. It serves areas without strict canister regulations.
What Makes It Stand Out: This kit includes everything needed for proper hanging technique straight out of the box—no separate purchases required. The waterproof construction keeps food dry during storms, while multiple attachment points and safety clips provide secure hanging options. Beyond bear protection, it functions as a general dry bag or gear organizer, adding versatility. The 10L capacity suits weekend trips.
Value for Money: At $22, this kit offers solid value compared to buying components individually, which would cost $30+. However, its value depends entirely on location—where canisters are mandatory, this kit becomes useless as primary protection. In hanging-acceptable zones, it provides cost-effective, reliable food security. The multi-use functionality extends its worth beyond just bear protection.
Strengths and Weaknesses: Strengths: complete all-in-one kit, waterproof protection, lightweight materials, versatile usage, and affordable price. Weaknesses: hanging method is location-dependent and skill-dependent; requires suitable trees; not effective against determined bears; not approved in regulated areas; capacity limited for longer trips; improper technique creates false security.
Bottom Line: This kit serves budget-conscious hikers in areas where hanging is permitted and effective. It’s an excellent secondary system for overflow items or short trips with proper tree availability. Never rely on it where canisters are legally required. For its intended purpose, it’s a practical, well-priced solution that covers all hanging basics.
4. Ultralight Bear Bag Food Hanging System for Camping & Hiking - Waterproof Food Bag with Easy 2-to-1 Pulley, Paracord Ropes, Rock Sok, Carabiners & Instructions
Overview: The Ultralight Bear Bag Hanging System revolutionizes traditional hanging with mechanical advantage at $29.95. Weighing just 6.5 ounces, this kit features an innovative 2-to-1 pulley that halves the effort needed to hoist food. It includes a waterproof bag, RockSok, paracord ropes, carabiners, and instructions—everything required for efficient hanging in bear country where canisters aren’t mandated.
What Makes It Stand Out: The pulley mechanism transforms hanging from a strenuous chore into a quick task. Simply fill the RockSok with rocks, toss it over a branch, and the pulley makes raising heavy food bags nearly effortless. This engineering eliminates tangled ropes and exhausted arms, encouraging proper technique. The comprehensive kit ensures no component is forgotten.
Value for Money: At $30, you’re paying a modest premium over basic hanging kits for genuine innovation. The time and energy saved per use justifies the extra cost, especially on tired evenings. However, like all hanging systems, its value drops to zero in canister-required areas. For trips where hanging is viable, the efficiency gain makes this the best-in-class option. The durable components ensure multiple seasons of use.
Strengths and Weaknesses: Strengths: revolutionary pulley system drastically reduces effort, ultralight weight, complete professional kit, waterproof bag, and clear instructions. Weaknesses: still requires suitable trees; ineffective against persistent bears; not legally compliant in regulated zones; bag capacity unspecified; more expensive than basic kits; technique still required.
Bottom Line: For backpackers committed to hanging where permitted, this system is unmatched in convenience. The pulley innovation alone makes it worth upgrading from basic rope kits. Just verify your destination accepts hanging methods before purchasing. It’s the smartest hanging solution available, but never a canister replacement.
5. NO-FED-BEAR UDAP Bear Resistant Canister, Hiking Camping Backpacking Hunting Food Storage Container with Carrying Case, 2 Gallons, BRCWC

Overview: The NO-FED-BEAR canister from UDAP offers certified protection at a mid-range $64.99 price. Designed by bear attack survivor Mark Matheny, this 2-gallon container holds 500 cubic inches while weighing just 2.4 pounds. It includes a convenient carrying case and educational bear safety booklet, positioning itself as a thoughtful alternative to premium brands for shorter backpacking trips.
What Makes It Stand Out: The survivor-designed backstory adds credibility and educational value, with the safety booklet reviewed by government professionals. The proprietary polymer blend with metal fasteners provides robust protection without excessive weight. The included carrying case with external strap options offers versatile packing—internal or external carry. Its compact 8" x 10" dimensions fit well in most packs.
Value for Money: At $65, this canister hits a sweet spot between budget and premium options. It’s $30 cheaper than the BV500 while offering similar certified protection. For 2-4 day trips, its capacity is perfect without paying for unused space. The included case and educational materials add value absent from competitors. However, frequent long-distance hikers may outgrow its smaller volume.
Strengths and Weaknesses: Strengths: affordable certified protection, lightweight design, included carrying case, educational safety booklet, survivor credibility, and compact dimensions. Weaknesses: limited 2-gallon capacity insufficient for trips beyond 4-5 days; opaque construction makes finding items harder; less established brand; metal fasteners may require tools; not transparent.
Bottom Line: The NO-FED-BEAR canister is an excellent value for weekend warriors and short-section hikers seeking certified protection without premium pricing. Its thoughtful inclusions and credible design make it a smart choice for those new to bear country. For extended trips, consider larger options. As a first canister or backup, it’s a reliable, well-priced investment in safety.
6. keepxaus Bear Bag Hanging Kit, 10L Waterproof Bear Bags for Food Backpacking Camping, Ultralight Bear Proof Canister Gear for Food Storage with Survival Nylon Ropes, Clips, Rock Pouch, Pulley System

Overview: The keepxaus Bear Bag Hanging Kit offers a comprehensive solution for backpackers seeking to protect their food from wildlife. This $17.99 kit includes a 10L waterproof bag, pulley system, rock pouch, two climbing clips, and 20 meters of nylon rope—everything needed to implement a proper bear hang. The system is designed for convenience, featuring a 2-to-1 pulley mechanism that makes lifting heavy food bags significantly easier than traditional methods. Made from 210T polyester, the bag claims to isolate food odors while remaining lightweight and packable.
What Makes It Stand Out: The integrated pulley system distinguishes this from basic stuff sacks, reducing physical strain and improving hang height. The complete package eliminates guesswork for beginners, providing all components in one purchase. The waterproof construction adds versatility for wet conditions, while the detachable shoulder strap offers dual functionality.
Value for Money: At under $18, this kit represents exceptional value compared to purchasing components separately. Similar hanging systems often cost $25-35, making this budget-friendly for casual campers. However, it’s not a certified bear canister, which limits its use in many national parks.
Strengths and Weaknesses: Pros: Complete all-in-one system; affordable price point; lightweight (under 8 oz); waterproof material; 3-year warranty; pulley reduces lifting effort Cons: Not IGBC-certified bear-proof; effectiveness depends entirely on proper hanging technique; polyester may not withstand sharp claws; 10L capacity insufficient for longer trips
Bottom Line: Ideal for rodent and small animal protection in areas where hangs are permitted, but not a substitute for hard-sided canisters in regulated bear country. Perfect for entry-level backpackers learning proper food storage techniques.
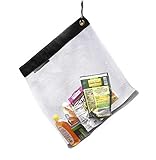
7. TAINESS Odor Proof Storage Bags Reusable Bear Bags for Food Backpacking No-Odor Zipper Barrier Bags Fit Home Organization, Food Storage,Freezer Safe (5p-8.5x10in)

Overview: The TAINESS Odor Proof Storage Bags provide a budget-friendly approach to food management for outdoor enthusiasts. This $9.49 set includes five 8.5x10-inch reusable bags made from food-grade PEVA material, designed to contain food odors and prevent leaks. Unlike rigid containers, these flexible bags pack flat and adapt to various food shapes, making them ideal for organizing meals in your pack. The zipper closure creates an airtight seal, while the material is freezer-safe for pre-trip meal preparation.
What Makes It Stand Out: The PEVA construction offers a reusable alternative to disposable plastic bags, aligning with Leave No Trace principles. Their odor-barrier technology helps minimize attractants, though they are not wildlife-proof. The multi-pack provides versatility for separating meals, snacks, and toiletries throughout your trip.
Value for Money: At less than $2 per bag, these represent excellent value for organization and odor control. They cost significantly less than specialized bear bags or canisters, making them accessible for all budgets. However, they should be viewed as a supplement to, not replacement for, proper wildlife storage systems.
Strengths and Weaknesses: Pros: Food-grade PEVA material; reusable and eco-friendly; effective odor containment; freezer-safe; leak-proof seal; extremely lightweight; versatile for home/trail use Cons: Not bear or rodent-proof; thin material vulnerable to punctures; zipper can fail in freezing temperatures; offers no physical protection; requires separate hanging system
Bottom Line: Excellent for meal organization and odor reduction, but these bags must be used within a proper bear hang or canister. Best for short trips or as part of a larger food protection strategy, not standalone wildlife defense.
8. RATSACK The Ultralight Camping Bag - Bear Bags for Food Backpacking - Bear Sack Rodent Proof Food Storage Container - Stainless Steel Ultralight Backpacking & Camping Hanging Mesh Bag - US Made (XS)
Overview: The RATSACK Ultralight Camping Bag addresses a specific niche in backcountry food protection: rodent resistance. Priced at $47.99, this US-made stainless steel mesh bag prioritizes breathability and weight savings over bombproof bear protection. The tightly woven metal fabric prevents mice, squirrels, and other small animals from chewing through, while allowing moisture to escape—preventing condensation that plagues waterproof bags. Weighing significantly less than hard-sided canisters, it appeals to ounce-counting backpackers in areas where bears aren’t the primary concern.
What Makes It Stand Out: American craftsmanship and the patented stainless steel mesh design set it apart from simple fabric bags. The breathable construction keeps food dry in humid conditions, and the flexible design packs more easily than rigid cylinders. It’s specifically engineered for rodent defense, addressing the most common food theft scenario on many trails.
Value for Money: While $48 seems steep for a mesh bag, it’s considerably cheaper than bear canisters and offers specialized protection that basic stuff sacks cannot. For hikers in rodent-heavy, low-bear-risk areas, it provides targeted value. However, its limited protection scope reduces overall value for those needing bear-proof solutions.
Strengths and Weaknesses: Pros: Excellent rodent protection; breathable prevents mold; lightweight compared to canisters; US-made quality; flexible packing; versatile for toiletries/trash Cons: NOT bear-proof; expensive for what it is; animals could still access contents if not properly hung; metal mesh can snag; requires separate odor-proof liner
Bottom Line: Outstanding choice for PCT, AT, or other rodent-dense trails where bears are rare. Useless in grizzly country or parks requiring certified canisters. Pair with odor-proof bags for best results.
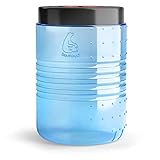
9. Backpackers’ Cache - Bear Proof Container

Overview: The Backpackers’ Cache Bear Proof Container represents the traditional approach to ursine food protection. At $87.95, this hard-sided canister provides the certified defense many national parks require. While the product description is minimal, bear canisters of this type typically feature robust polycarbonate construction and twist-lock lids that bears cannot open. The container serves a singular purpose: keeping food inaccessible to bears through physical barriers rather than hanging techniques.
What Makes It Stand Out: Its simplicity is both strength and weakness. Without complex features, there are fewer failure points. The proven cylindrical design has been used for decades in bear country. For backpackers visiting parks with mandatory canister regulations, this represents a compliant solution that rangers immediately recognize and approve.
Value for Money: Priced in the standard range for bear canisters ($70-100), it offers fair value for required protection. However, newer models at similar prices include features like transparent sides, easier opening mechanisms, and lighter weights. This basic model competes on reliability rather than innovation.
Strengths and Weaknesses: Pros: IGBC-approved (typical for this category); proven bear-proof design; no hanging required; works in any terrain; durable construction Cons: Heavy (usually 2-3 lbs); bulky in pack; minimal features; difficult for humans to open; expensive for simple design; no rodent protection when open
Bottom Line: A functional but uninspired choice for regulated bear country. It meets requirements but offers no advantages over similarly priced competitors. Consider newer alternatives unless you find this at a significant discount.
10. Counter Assault Bear Keg Food Storage Container Yellow

Overview: The Counter Assault Bear Keg stands as a premium, regulation-compliant food storage solution for serious backcountry travelers in bear country. At $99.95, this container justifies its price through IGBC and SIBBG certifications that make it mandatory in many national parks. With 716 cubic inches of storage, it accommodates approximately 6-7 days of food for one person. The bright yellow color helps prevent leaving it behind, while the durable construction withstands both bear attempts and rough handling in your pack.
What Makes It Stand Out: Dual certifications from leading bear safety organizations ensure park compliance across the western US. The container’s size hits a sweet spot for week-long trips without excessive bulk. Counter Assault’s reputation in bear deterrent products lends credibility to their storage solutions.
Value for Money: While nearly $100 seems steep, it’s competitive with other certified canisters and cheaper than bear-resistant food lockers or fines for non-compliance. For frequent visitors to parks like Yosemite or Rocky Mountain, it’s a necessary investment. Casual campers may find rental options more economical.
Strengths and Weaknesses: Pros: Officially approved everywhere; robust construction; good capacity; visible color; proven effectiveness; no trees required Cons: Heavy (nearly 3 lbs); expensive; awkward pack shape; challenging opening mechanism; overkill for rodent-only areas
Bottom Line: Essential gear for dedicated backpackers in regulated grizzly/black bear territory. The cost and weight are justified by legal requirements and proven protection. For occasional use, consider renting; for annual trips, this is a worthwhile purchase.
Why Bear-Proof Food Storage is a Backcountry Essential
Bear-proof food storage isn’t merely a suggestion—it’s a fundamental pillar of modern wilderness ethics and often a legal requirement. When bears associate humans with easy meals, the consequences are fatal: wildlife managers are forced to euthanize habituated bears, and future hikers face increased danger. A certified bear-proof container creates an impenetrable barrier that teaches bears your food is inaccessible, preserving their natural foraging behaviors and keeping you safe. This psychological conditioning is so critical that most national parks and wilderness areas in bear country now mandate approved storage devices, with rangers conducting spot checks and issuing substantial fines for non-compliance. Your backpack choice directly impacts how effectively you’ll use these containers, influencing whether you’ll actually pack them properly or leave them behind out of frustration.
Decoding Bear-Proof Certifications: IGBC and SIBBG Standards
Before selecting any food container, understand the two primary certification bodies. The Interagency Grizzly Bear Committee (IGBC) tests containers against captive grizzlies, requiring devices to withstand 60 minutes of direct contact without failure. The Sierra Interagency Black Bear Group (SIBBG) focuses on black bear intelligence and dexterity, employing a different testing protocol. Look for explicit certification stamps—generic “bear-resistant” claims without these designations are marketing fluff, not safety guarantees. These standards also specify locking mechanisms, material thickness, and structural integrity that directly affect how a container fits and rides in your pack. A container that bulges or has protruding latches will create pressure points and packing nightmares.
Hard-Sided Canisters vs. Soft-Sided Bear Bags: Making the Right Choice
The bear-proof container market splits into two distinct categories, each with profound implications for backpack selection. Hard-sided canisters—typically cylindrical polycarbonate or ABS plastic vaults—offer bombproof protection and universal regulatory acceptance but add 2-3 pounds of empty weight and create awkward dead space in packs. Soft-sided bear-resistant bags like Ursacks use bulletproof Spectra fabric to thwart claws and teeth, weighing mere ounces and conforming to pack shapes, but face restrictions in some parks and require proper tying techniques. Your backpack choice must align with your container philosophy: a 70-liter pack designed for a rigid 11-liter canister has entirely different interior architecture than one built for flexible bag systems.
Backpack Volume Requirements: Sizing Your Pack for Bear Canisters
Matching pack volume to canister size is where most hikers first stumble. A standard 11.5-liter bear canister (suitable for 5-7 days of food) occupies roughly 700 cubic inches and requires a minimum 55-liter backpack for comfortable integration. For weekend trips with smaller 7-liter canisters, a 45-liter pack suffices. Multi-week expeditions demanding dual canisters or the massive 15-liter models need 75+ liter packs with exceptional load-carrying comfort. Crucially, these calculations must account for the canister occupying prime real estate—the central core of your pack—forcing sleeping bags, clothing, and other bulky items into peripheral spaces. Always size up by 10-15 liters when bear canisters are mandatory to maintain packing flexibility.
Key Backpack Features for Optimal Bear Canister Integration
Certain backpack design elements transform canister carrying from chore to seamless operation. Dedicated canister sleeves—vertical or horizontal compression panels in the main compartment—prevent the cylinder from shifting and creating uncomfortable pressure points. Removable top lids with extended collar heights accommodate canisters protruding above the frame, while dual-tier side compression straps let you lash the canister externally when interior space is exhausted. Look for packs with flat, reinforced pack bottoms that support canister weight without sagging, and frame sheets with cutaway sections that create a recessed cradle, lowering the canister’s center of gravity. These features aren’t gimmicks; they’re engineered solutions to a specific mechanical challenge.
Frame Design: Internal vs. External for Heavy Loads
The internal vs. external frame debate takes on new urgency with bear canisters. Modern internal-frame packs dominate the market for good reason: their wrap-around design hugs the canister close to your back, improving balance on technical terrain. However, external-frame packs offer superior weight transfer for the 30-40 pound loads common on canister-mandated trips, creating a shelf-like platform that supports the cylinder’s bulk without compromising the main bag’s shape. For most hikers, a robust internal-frame pack with a perimeter frame and cross-stays provides the best compromise, offering the stability of externals with the sleek profile of internals. Avoid ultralight frameless packs unless you’re using minimal soft-sided bags—their lack of structure turns canisters into torturous back-pounders.
The Physics of Weight Distribution: Packing Your Canister Correctly
Bear canisters concentrate 8-12 pounds of dense weight in a compact cylinder, creating unique biomechanical challenges. The golden rule: center the canister horizontally and position it vertically against your upper back, roughly between your shoulder blades. This placement aligns the load with your natural center of gravity, preventing the backward pull that strains your lower back. Pack the canister with the heaviest items (dense foods like peanut butter, cheese, and dehydrated meals) at the bottom of the cylinder, then place the entire canister low in your pack but not at the very bottom—suspend it 3-4 inches above the pack base to maintain load transfer to your hips. Counterbalance by placing lighter, bulkier items like sleeping bags in the lower pack compartments.
Access Systems: Top-Loaders, Panel-Loaders, and Bear Canister Reality
Your backpack’s access method dramatically affects daily convenience with bear canisters. Top-loading packs require complete unloading to access the canister, which becomes maddening during lunch stops. Panel-loading packs with full U-shaped zippers let you extract the canister without disturbing your entire kit, but zippers add weight and potential failure points. The hybrid solution—top-loaders with front-facing shove-it pockets—allows you to store the canister in the main compartment while keeping daily snacks in a separate, non-bear-proof stuff sack that gets cached with the main canister at night. For truly efficient access, some packs feature side-entry zippers positioned to align with a vertically-oriented canister, letting you slide it out like a drawer.
Hip Belt Engineering and Load Transfer Comfort
With a canister’s concentrated weight, hip belt design becomes paramount, not optional. Look for dual-density foam construction—firm EVA foam against the pack for load support, softer foam against your body for comfort. The belt should be minimum 4 inches wide with wrap-around wings that extend at least 6 inches forward from the iliac crest. Load-gripper stitching—reinforced patterns that prevent the belt from folding under weight—maintains consistent pressure distribution. Skip hip belts with integrated pockets if they compromise structural integrity; instead, opt for detachable pockets that preserve the belt’s load-bearing surface. A properly fitted hip belt should transfer 70-80% of the canister’s weight off your shoulders, making 40-pound loads feel like 25.
Fabric Durability and Abrasion Resistance
Bear canisters are unforgiving on pack interiors. Their hard edges and concentrated weight act like cheese graters on lightweight fabrics. Look for 420-denier nylon minimum in the main body, with 840-denier ballistic nylon or X-Pac laminate in high-wear areas where the canister contacts the pack. Double-layered pack bottoms are non-negotiable—reinforced with hypalon or TPU coating to prevent the canister from abrading through after a week of jostling. Some manufacturers apply internal abrasion pads at key contact points, sacrificing a few ounces to prevent catastrophic fabric failure 20 miles from the trailhead. Avoid ultralight Dyneema Composite Fabrics unless specifically engineered for canister use; their thin profile offers minimal protection against sustained abrasion.
Weather Protection Strategies for Food Storage
Bear canisters aren’t waterproof, and a wet canister exterior becomes a scent magnet. Your backpack must provide integrated rain protection that extends over the canister zone. A detachable rain cover with cinch-cord closure is essential, but more sophisticated packs feature water-resistant zippers and coated pack cloth that repels moisture even without the cover. Internally, use a large pack liner (trash compactor bags work perfectly) that encapsulates the canister and surrounding gear, preventing scent leakage from spilled food. For soft-sided bags, which are inherently less weatherproof, choose packs with dry bag-style roll-top closures and consider a separate waterproof stuff sack for the bag itself—remember, a wet bear bag is a smelly bear bag.
Trip Planning: Matching Canister Size to Expedition Length
Calculating canister volume requires more than simple multiplication. Plan for 2,500-3,000 calories per day (roughly 1.5-2 pounds of food), which translates to about 1.5 liters of packed volume daily. However, factor in packing inefficiency—the void spaces between items waste 20-30% of theoretical capacity. A 7-day trip needs an 11.5-liter canister minimum, but you’ll need to pack with ruthless efficiency: remove all commercial packaging, repackage into zip-lock bags, and vacuum-seal where possible. For trips exceeding canister capacity, plan food caches if regulations permit, or accept the weight penalty of carrying two canisters. Never assume you can “pack tighter”—overstuffed canisters stress latches and create scent trails.
Mastering the Pack: Efficient Bear Canister Loading Techniques
The art of loading a canister into your pack separates novices from seasoned backcountry travelers. Vertical orientation is generally superior—standing the canister on end allows side pockets and compression straps to contour around it, maintaining pack shape. First, line your pack with a protective ground sheet or pack liner. Place your sleeping bag in the bottom, then position the canister upright, wedged against the frame sheet. Fill the remaining space with soft items like clothing, using them as padding to prevent shifting. For horizontal loading (better for some panel-loaders), center the canister and surround it with equal weight distribution to prevent listing. Use sleeping pad straps to secure the canister externally only as a last resort—this raises your center of gravity and risks damage.
Complete Camp Security: Beyond Just the Canister
Your backpack and canister are just one layer of a multi-tiered defense system. At camp, never store your canister in or near your pack—bears will destroy the pack trying to reach the container. Place the canister 100 yards downwind from your sleeping area, ideally in a depression or against rocks that prevent rolling. Odor-proof bags (OPSAKs) inside the canister add a critical scent barrier—use them for all food, trash, and scented items like sunscreen and toothpaste. Your backpack itself must be emptied of all smellables and stored upside-down, pockets unzipped, 50 yards from both kitchen and sleeping areas. Some hikers use bear-resistant bags for their entire pack, but these are heavy and impractical for most trips. The key is scent discipline: treat anything with fragrance as bear attractant.
Navigating Regulations: Federal, State, and Local Requirements
Bear-proof regulations form a confusing patchwork across jurisdictions. Yosemite, Sequoia, and Rocky Mountain National Parks require hard-sided canisters exclusively—soft bags are prohibited regardless of certification. The Adirondack High Peaks mandates canisters year-round, while Alaska’s Denali allows hanging in some zones but requires canisters in others. Pacific Crest Trail hikers face varying rules every 50 miles. Research requirements 90 days before departure, as regulations change seasonally based on bear activity. Carry printed documentation of the specific certifications your container holds—rangers may not recognize newer models. Some areas require permits that list your canister model number, making last-minute gear swaps impossible. Failure to comply can result in fines exceeding $5,000 and immediate ejection from the wilderness.
Maintenance Protocols for Long-Term Gear Performance
Bear canisters and backpacks endure extreme abuse and require specific care. After each trip, wash canisters with unscented soap and inspect for cracks, especially around locking mechanisms—UV degradation weakens polycarbonate over time. Store canisters unlatched to prevent gasket compression and odor retention. For backpacks, vacuum out food debris from seams and pockets where scent lingers. Wash with technical fabric cleaner, never regular detergent, which leaves fragrance. Inspect abrasion points and apply Tenacious Tape to reinforce worn areas before they fail. Check all compression straps and buckles—canister weight stresses these components more than typical loads. Annually, apply Nikwax treatment to maintain water resistance. Proper maintenance extends gear life and ensures your safety system doesn’t fail when you need it most.
Critical Errors That Compromise Bear Safety
Even with perfect gear, user error creates dangerous situations. Overpacking canisters so latches don’t fully engage is the most common mistake—if you can pry the lid with your hands, a bear can with its claws. Storing canisters near water risks losing your food to a curious bear’s batting practice; always wedge them between rocks or logs. Forgetting to lock the canister after each access is surprisingly frequent—establish a ritual: access, eat, lock, place. Putting scented items in pack pockets instead of the canister teaches bears to associate packs with rewards. Relying on “bear-proof” labels without verifying current certifications has led to countless incidents. The most dangerous error? Storing canisters in vehicles at trailheads—bears have learned to break windows, and insurance doesn’t cover bear break-ins.
Frequently Asked Questions
What’s the difference between bear-proof and bear-resistant? “Bear-proof” suggests complete impenetrability, but no container is truly invincible given enough time and motivation. “Bear-resistant” is the accurate term used by certification agencies, meaning the device withstands standard testing protocols for a specified duration. Always look for certified bear-resistant containers from IGBC or SIBBG rather than trusting marketing language.
How do I know what size bear canister I need for my trip? Calculate 1.5-2 liters per person per day for average appetites, then add 30% for packing inefficiency. For a 5-day solo trip, an 11.5-liter canister is standard. Weekenders can use 7-8 liter models, while groups on 10-day trips may need two 11.5-liter canisters or a single 15-liter expedition model. When in doubt, size up—an underfilled large canister is better than an overstuffed small one.
Can I use a traditional bear hang instead of carrying a canister? Regulations increasingly prohibit hangs because bears have learned to defeat them. Many areas allow hangs only where trees are suitable (strong branch 15+ feet high, 10 feet from trunk), but these conditions are rare. Even where legal, hangs take 30+ minutes, often fail, and don’t protect against mini-bears like raccoons and rodents. Canisters are more reliable and increasingly required by law.
What should I do if I see a bear with my canister? Never approach a bear with your canister. From a safe distance, make noise to scare the bear away—most will flee, leaving the canister. If the bear remains, note your location and report to rangers; they may retrieve it once the bear abandons it. Never try to fight a bear for your food. Your safety outweighs any food value, and most canisters survive bear encounters with only cosmetic damage.
How do I pack scented toiletries and personal items? All scented items—toothpaste, sunscreen, bug spray, deodorant, feminine products—must go in your bear canister. Use small OPACK odor-proof bags to separate them from food. Many hikers carry a dedicated “smellables” kit that fits inside the canister. Never store these items in your pack pockets or hang them separately; bears don’t distinguish between food scents and cosmetic scents.
Are Ursack-style bear bags as effective as hard canisters? Ursacks are IGBC-certified and highly effective against black bears and many grizzlies, but some parks specifically prohibit them. They’re lighter and pack better but require proper tying to trees (which takes skill) and don’t prevent food crushing. Hard canisters offer universal acceptance and protect contents from being pulverized. Check your destination’s regulations before choosing.
What’s the penalty for not using proper bear-proof storage? Fines vary by jurisdiction but typically range from $75 to $5,000 per violation. Yosemite issues $125 tickets for first offenses, escalating to $5,000 and court appearances for repeat offenders. Beyond fines, you may be ejected from the park, banned from future permits, and held liable for costs if a bear is euthanized due to your negligence. Criminal charges are possible in extreme cases.
How do I clean my bear canister to remove food odors? Wash with unscented dish soap and warm water, using a sponge to scrub all surfaces. For stubborn odors, use a diluted bleach solution (1:10 ratio) or baking soda paste, then rinse thoroughly. Dry completely with the lid off. Avoid scented cleaners that leave residue. Some hikers store canisters with a small pouch of activated charcoal between trips to absorb lingering smells.
Can I fly with a bear canister in my checked luggage? Yes, bear canisters are TSA-approved for checked bags. Pack them empty and open to allow inspection. Some travelers place a note inside explaining its purpose. Consider nesting smaller items inside the canister to save space, but be prepared for TSA to inspect. Never pack fuel canisters or bear spray inside—those are prohibited in both carry-on and checked luggage.
Do I need a bear canister in winter when bears are hibernating? Regulations often relax in winter, but this is location-specific. Some bears emerge during warm spells, and many areas have active winter bear populations. Additionally, regulations may still require canisters to protect against other wildlife like wolverines, raccoons, and rodents. Always check current requirements for your specific dates and location—never assume winter means exemption.'