There’s something uniquely maddening about reaching into your cooler mid-road trip only to find your sandwiches swimming in melted ice water, the grapes have frozen solid next to the ice packs, and those expensive cheeses have absorbed the unmistakable aroma of last night’s leftover garlic dip. We’ve all been there—standing at a rest stop, soggy snack in hand, wondering why cooler organization feels like an unsolvable physics problem. Enter locking cooler dividers: the unsung heroes of culinary road-trip success that transform your ice chest from a chaotic cold box into a precisely engineered food preservation system. These ingenious accessories don’t just separate your snacks—they create distinct temperature zones, prevent cross-contamination, and ensure your carefully planned provisions arrive at your destination exactly as intended.
Unlike flimsy plastic bins that slide around with every sharp turn or makeshift cardboard partitions that disintegrate at the first sign of condensation, modern locking dividers are engineered specifically for the dynamic environment of travel. They account for vibration, temperature fluctuations, and the brutal reality of melted ice while maintaining structural integrity. Whether you’re a weekend warrior heading to the mountains or a cross-country nomad living out of your vehicle, understanding the nuanced world of locking cooler dividers will revolutionize how you think about mobile food storage.
Top 10 Locking Cooler Dividers for Road-Trip Snacks
Detailed Product Reviews
1. RTIC 16 QT Road Trip Cooler Freezable Divider Insert Accessories Perfect for Organization, 16 QT.

Overview:
The RTIC 16 QT Road Trip Cooler Freezable Divider is a specialized insert designed exclusively for RTIC’s 16-quart road trip cooler. This accessory transforms your cooler into an organized, two-zone storage system while providing additional cooling power. Pre-freeze the divider and it functions as both a partition and an auxiliary ice pack, keeping items separated and chilled simultaneously.
What Makes It Stand Out:
Precision engineering ensures this divider fits the RTIC 16 QT cooler perfectly, eliminating wasted space and movement. Its freezable design is the standout feature—most dividers only organize, but this one actively contributes to temperature management. The robust construction maintains rigidity even when frozen solid, preventing cracking or warping during regular use.
Value for Money:
At $18.99, the divider costs nearly a third of the cooler itself, which may seem steep for an accessory. However, frequent travelers and outdoor enthusiasts will appreciate the dual functionality. It essentially upgrades your existing cooler with premium organization and extended cooling capability without requiring a complete replacement, making it a cost-effective enhancement for heavy users.
Strengths and Weaknesses:
Strengths:
- Perfect custom fit for RTIC 16 QT Road Trip Cooler
- Doubles as organizational divider and extra ice pack
- High-quality, easy-to-clean materials
- Maintains structural integrity when frozen
Weaknesses:
- Compatible only with one specific cooler model
- Cooler performs adequately without this accessory
- Relatively expensive for a single-purpose add-on
- Adds weight and requires pre-planning to freeze
Bottom Line:
This divider is a worthwhile investment for dedicated RTIC 16 QT users who value organization and extended cooling, but casual campers may find it an unnecessary expense.
2. EONJOE 4-pack Small Snackle Box Container Dishwasher Safe Bpa Free 4 Compartments Snack Containers for Travel Road Trip Kids School Adult Work

Overview:
The EONJOE 4-pack Snackle Box containers offer a practical solution for portion-controlled snacking on the go. Each BPA-free container features four compartments with airtight snap-lock lids and silicone seals. Designed for versatility, these dishwasher-safe containers work for school lunches, road trips, meal prep, and workplace snacking.
What Makes It Stand Out:
The combination of affordability and comprehensive features distinguishes this set. Four containers for $19.99 provides exceptional value, while the silicone-sealed lids offer genuine leak-proof performance rarely found in budget-friendly options. The food-grade PP5 plastic withstands freezing, refrigeration, and dishwasher cycles without degrading, making these truly multi-environment containers.
Value for Money:
At under $5 per container, this set delivers remarkable value. Comparable single-compartment containers often cost more individually, while specialty bento boxes can run $15-25 each. The four-compartment design eliminates the need for multiple separate containers, reducing both cost and environmental waste from disposable bags. For families or meal preppers, the four-pack quantity is perfectly calibrated for weekly use.
Strengths and Weaknesses:
Strengths:
- Excellent value with four containers per set
- Genuine leak-proof silicone seals
- BPA-free, food-grade materials
- Dishwasher, freezer, and microwave safe
- Perfect portion control for diverse diets
Weaknesses:
- Compartments may be too small for hearty appetites
- Plastic construction less durable than glass alternatives
- Lids require proper alignment for secure seal
- Not suitable for liquid-heavy meals without leaks
Bottom Line:
These containers are an excellent purchase for anyone seeking organized, portable snacking solutions, offering professional-grade features at a budget-friendly price point.
3. High Road SnackStash Soft Car Cooler Bag for Cold and Hot Food Transport - Insulated Backseat Cooler Bag for Car, SUV, Truck or Van - Portable Soft Cooler with Storage Pocket and Bottle Holders
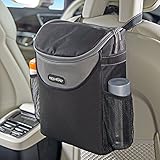
Overview:
The High Road SnackStash is a versatile soft cooler bag designed to hang from vehicle headrests, transforming unused seatback space into organized cold storage. Measuring 12.5" x 10" x 4", it holds up to eight 16-ounce bottles or fifteen cans, making it ideal for road trips, food delivery, or daily commutes. The insulated PEVA liner maintains temperatures for up to 30 hours cold or 8 hours hot.
What Makes It Stand Out:
Its patented headrest-mounting system sets this cooler apart from traditional floor-standing models. The design keeps contents accessible without occupying seat or footwell space. Multiple exterior pockets—including two mesh side pockets and a stretch neoprene front pocket—provide organized storage for utensils, wipes, and napkins. The adjustable strap doubles as a shoulder carrier for picnics and sporting events.
Value for Money:
At $22.99, the SnackStash offers excellent value for specialized automotive organization. Comparable soft coolers lack the vehicle-specific mounting system, while traditional car organizers don’t provide insulation. For rideshare drivers, road trippers, or traveling families, the space-saving design and dual hot/cold functionality justify every penny, essentially combining two products into one.
Strengths and Weaknesses:
Strengths:
- Space-saving headrest-mounted design
- Maintains temperature for extended periods
- Multiple exterior storage pockets
- Versatile for hot and cold items
- Universal fit for any vehicle headrest
Weaknesses:
- PEVA liner vulnerable to punctures from sharp objects
- Requires cooler packs; ice can damage interior
- Limited capacity for larger families
- Insulation performance varies with ambient temperature
Bottom Line:
The SnackStash is a smart investment for frequent drivers and travelers seeking convenient, space-efficient food and beverage storage, though careful handling is required to protect the liner.
Why Locking Cooler Dividers Transform Road Trip Snacking
The difference between a good road trip and a great one often comes down to the quality of your snacks—and whether they’re actually edible when hunger strikes. Locking cooler dividers create micro-environments within your cooler’s macro-climate, allowing you to store delicate berries at optimal crispness in one zone while keeping deli meats at food-safe temperatures in another. This segmentation prevents the domino effect of temperature transfer that occurs when ice directly contacts produce, causing cellular damage and turning your pristine strawberries into mush.
Beyond temperature control, these dividers address the psychological component of travel eating. When you’re driving for hours, the last thing you want is to dig through a jumbled mess to find that one specific snack. Dividers create visual organization that reduces search time and minimizes the frequency of opening your cooler—each lid lift lets precious cold air escape and warm air in, accelerating ice melt and compromising food safety. The locking mechanism ensures that even when your cooler is bouncing down a gravel road or being hastily grabbed from the trunk, your organizational system stays intact.
The Anatomy of a Locking Cooler Divider: Components Explained
Understanding what makes a divider truly “locking” requires dissecting its fundamental components. At its core, every system consists of three primary elements: the partition panel, the sealing gasket, and the anchoring mechanism. The partition panel serves as the physical barrier, typically engineered with precision-cut channels that allow cold air circulation while blocking direct contact between zones. Premium designs incorporate ribbed structures or honeycomb patterns that provide maximum rigidity with minimal material thickness, preserving valuable interior volume.
The sealing gasket—often overlooked but critically important—creates a thermal bridge between the divider edge and cooler wall. This flexible strip, usually made from food-grade silicone or thermoplastic elastomer, compresses to fill microscopic gaps that would otherwise allow cold air migration. The anchoring mechanism is where the “locking” magic happens, employing everything from cam-action levers to magnetic assemblies that create pounds of clamping force without requiring permanent modification to your cooler interior.
Material Science: From BPA-Free Plastics to Marine-Grade Metals
The material composition of your divider directly impacts both performance and food safety. High-density polyethylene (HDPE) remains the gold standard for partition panels due to its exceptional strength-to-weight ratio, natural chemical resistance, and FDA-approved food contact status. Unlike standard polypropylene, HDPE maintains structural integrity at sub-freezing temperatures without becoming brittle, crucial for dividers that will spend hours in direct contact with ice.
For those seeking ultimate durability, marine-grade aluminum alloys offer superior thermal conductivity and virtually unlimited lifespan, though they require anodizing or powder-coating to prevent oxidation and ensure food safety. The cutting edge of divider materials includes glass-filled nylon composites that combine the lightweight properties of plastic with metal-like stiffness, often found in premium modular systems designed for expedition-level use. When evaluating materials, look for NSF certification or equivalent food safety ratings—not just BPA-free claims, which have become a baseline expectation rather than a premium feature.
Locking Mechanism Deep Dive: Compression, Clip, and Magnetic Systems
Not all locks are created equal, and the mechanism you choose dramatically affects both installation convenience and long-term reliability. Compression-lock systems utilize a threaded rod or cam lever that expands rubberized feet against cooler walls, creating friction-based stability. These excel in rotomolded coolers with thick, uniform walls but may struggle in injection-molded models with thinner sections or internal ribs.
Clip-based mechanisms employ spring-loaded jaws that grip onto built-in cooler features like molded handles or drainage channels. While offering tool-free installation and removal, they depend entirely on your cooler’s specific geometry and may introduce vibration-induced rattling if not perfectly tensioned. Magnetic locking represents the newest innovation, using rare-earth magnets embedded in silicone boots that adhere to steel cooler liners—common in premium rotomolded models. This system provides infinite adjustability and silent operation but requires a ferrous metal surface and adds slight weight.
Size Dynamics: Height, Thickness, and Span Considerations
The dimensional relationship between divider and cooler interior determines everything from thermal efficiency to usable space. Height should extend to within half an inch of the cooler’s interior lid line but never touch it—this allows the lid gasket to seal properly while minimizing air exchange between zones. Thickness follows a paradox: thinner panels maximize volume but risk flexing under load, while thicker panels add structural rigidity at the cost of precious interior space. The sweet spot for most applications falls between 0.25 and 0.375 inches for polymer dividers, or 0.125 inches for reinforced aluminum.
Span—the distance the divider must bridge—directly correlates with required stiffness. A divider crossing a 12-inch width needs significantly less reinforcement than one spanning 24 inches. Premium systems address this with telescoping designs that incorporate internal support braces at extended lengths, preventing the bowing that creates gaps and compromises thermal separation. Always measure your cooler’s narrowest point, accounting for any interior protrusions like drain plugs or anti-skid patterns.
Temperature Zone Strategy: Cold, Cool, and Crisp Sections
Creating effective temperature zones isn’t about randomly placing dividers—it’s about understanding thermodynamics in a confined space. The coldest zone should occupy the bottom third of your cooler, directly above the ice or ice packs, maintaining temperatures between 32-35°F for raw proteins and dairy. The middle “cool” zone, ideal for beverages and prepared sandwiches, typically hovers at 38-42°F, while the upper “crisp” zone stays around 45-50°F—perfect for produce that suffers from cold damage.
Strategic divider placement manipulates natural convection currents within your cooler. Cold air sinks, so positioning a solid panel too low creates a thermal dead zone where temperatures drop below freezing. Conversely, panels with perforated lower sections allow controlled cold air bleed, maintaining consistent temperatures without creating ice pockets. For multi-day trips, consider a three-zone approach: frozen items at the base separated from refrigerated goods by a solid divider, with a vented divider above creating a produce-friendly top zone that benefits from rising cold air without direct ice contact.
Installation Intelligence: Tool-Free vs. Permanent Mounting
Your installation philosophy should align with your travel style and cooler commitment level. Tool-free systems prioritize flexibility, allowing you to reconfigure zones based on trip length or passenger count. These typically employ expandable pressure mounts or magnetic attachments that install in under a minute but may require periodic re-tightening as vibrations loosen connections during travel. They’re ideal for renters, those with multiple coolers, or anyone who values adaptability over absolute rigidity.
Permanent mounting involves drilling holes and installing threaded inserts or mounting rails directly into your cooler walls. While this voids most manufacturer warranties, it creates an unshakeable organizational system that can support heavier loads and withstand extreme off-road conditions. Professional installations often incorporate marine-grade stainless steel hardware and waterproof sealants to maintain cooler integrity. Consider this route only if you’re committed to a single cooler for years and prioritize maximum stability over resale value.
Modular Design Philosophy: Building Your Perfect Configuration
The most sophisticated divider systems embrace modularity, treating your cooler interior like a customizable storage ecosystem. These systems start with a base rail or track system mounted along the cooler’s interior length, allowing partitions to slide and lock at any position. Advanced configurations include horizontal shelves that create stackable layers, vertical dividers that segment those layers, and specialized inserts for holding cans, bottles, or fragile items like eggs.
Modularity shines on extended trips where your needs evolve. Day one might require maximum beverage space for a group, while day four demands more room for leftover meal prep containers. Systems with quick-release pins or cam locks let you transform your layout in seconds without emptying the entire cooler. Look for modular designs that offer accessory compatibility—can holders that attach to divider faces, cutting boards that mount on top edges, or dry storage bins that hang from integrated hooks. This expandability ensures your system grows with your adventure repertoire.
Load-Bearing Logic: Weight Distribution and Structural Integrity
A divider’s primary function extends beyond separation—it must bear the lateral load of items pressing against it during dynamic movement. When your vehicle brakes suddenly, contents continue moving forward, exerting tremendous force on partition panels. A divider that buckles under this load creates a domino effect, crushing delicate items and destroying your carefully planned organization. Engineering specifications should include a load rating, typically measured in pounds per square foot of panel area.
The key lies in transferring these forces to the cooler walls rather than letting the panel absorb them. Premium designs incorporate load-spreading feet or brackets that distribute pressure across a larger surface area, preventing localized stress points that could crack cooler liners. For heavy loads like glass bottles or dense food containers, consider dividers with integrated cross-bracing or the ability to add support struts. Remember that water weighs 8.3 pounds per gallon—melted ice at the bottom of your cooler creates significant hydrostatic pressure that can exploit any weakness in divider mounting.
Hygiene and Maintenance: Keeping Dividers Food-Safe
Road trip conditions create a perfect storm for bacterial growth: moisture, nutrients from spilled food, and temperatures that may hover in the danger zone during cooler restocking. Your divider system must be designed for thorough cleaning, not just surface wiping. Smooth, non-porous surfaces without crevices or hollow sections prevent biofilm formation—avoid designs with exposed foam cores or unsealed edges where water can infiltrate and breed microbes.
Dishwasher-safe materials simplify sanitation, but verify that locking mechanisms can withstand high-temperature cycles without degrading. For manual cleaning, look for dividers with quick-release components that separate into flat panels and hardware, eliminating hidden corners where mold can establish beachheads. Some premium systems incorporate antimicrobial additives directly into the polymer matrix, providing continuous protection between cleanings. Establish a cleaning protocol that includes disassembly at trip’s end, sanitizing with a food-safe quaternary ammonium solution, and complete air-drying before storage to prevent mildew.
Compatibility Matrix: Measuring Your Cooler for Success
A divider that fits perfectly in one model may be completely useless in another, making pre-purchase measurement critical. Start by documenting your cooler’s interior dimensions at multiple points—many coolers taper toward the bottom, and published specifications often refer to exterior measurements. Use a flexible tape measure to capture the width at the top rim, mid-section, and bottom, noting any interior features that could interfere.
Create a compatibility checklist: wall thickness (affects clamp depth), presence of drainage channels (potential mounting points), interior texture (smooth vs. textured impacts seal quality), and lid clearance (determines maximum divider height). Some manufacturers provide cooler-specific divider templates or compatibility charts, but always verify with your own measurements. For coolers with integrated features like dry storage trays or cutting board lids, ensure your divider system accommodates these accessories rather than competing with them.
The DIY Divider Debate: When Homemade Makes Sense
The internet abounds with tutorials for creating cooler dividers from cutting boards, plastic containers, and weatherstripping. While DIY solutions offer customization and cost savings, they rarely match commercial systems in performance or longevity. Homemade dividers excel for highly specific, unchanging needs—like creating a dedicated wine bottle section in a cooler you only use for picnics. They also make sense for odd-shaped coolers where commercial options don’t exist, such as vintage metal Coleman models or custom-built truck chests.
However, DIY approaches typically lack engineered sealing systems, resulting in poor thermal separation. The materials may not be food-grade or may degrade when exposed to cooler chemicals and temperatures. Most critically, homemade locks—often consisting of bungee cords or friction fits—fail under travel conditions, turning your divider into a projectile during sudden stops. If you pursue the DIY route, invest in commercial-grade sealing gaskets and positive-locking hardware rather than improvising with hardware store components. The cost savings evaporate quickly when spoiled food or a ruined cooler liner enters the equation.
Price Point Analysis: Budget, Mid-Range, and Premium Tiers
Budget divider systems ($15-30) typically feature simple friction-fit designs in basic HDPE, offering minimal sealing and limited adjustability. These work adequately for short trips where perfect temperature control isn’t critical, but expect to replace them annually as locking mechanisms wear out. Mid-range options ($35-70) introduce proper gasket sealing, tool-free installation, and some modular capabilities, representing the sweet spot for most recreational road trippers who take 4-8 trips per year.
Premium systems ($75-150+) justify their cost through advanced materials like carbon-fiber-reinforced polymers or anodized aluminum, sophisticated locking mechanisms that maintain tension for years, and true modular ecosystems with extensive accessory compatibility. These dividers often include lifetime warranties and are designed for professional guides, overlanders, or anyone who lives on the road. Consider your cost-per-use: a $120 divider used weekly for five years costs $0.46 per trip, while a $25 budget option that fails after one season costs $2.08 per trip. The premium option also protects the investment in your cooler and the food inside it.
Pitfalls and Problems: What Buyers Regret Most
The most common mistake is prioritizing divider count over divider quality. A three-panel budget set seems more versatile than a single premium divider, but those panels will shift, leak, and eventually crack, leaving you worse off than when you started. Another frequent regret is buying dividers that are too tall, preventing the cooler lid from sealing properly and destroying thermal efficiency. Always leave a minimum 0.5-inch clearance between divider top and lid underside.
Buyers often overlook the importance of divider removal ease. A system that installs securely but requires pliers and sweat to remove becomes a permanent fixture, eliminating cooler versatility for trips where you need maximum open space. Test the removal process before committing, especially if your hands will be cold or gloved during use. Finally, many purchase dividers without considering their complete snack ecosystem—if you rely on specific containers or bottles, ensure divider spacing accommodates them without wasting volume.
Long-Term Value: Upgrade Paths and Multi-Cooler Use
A truly excellent divider system should outlast your current cooler and adapt to future upgrades. Look for brands that maintain consistent mounting standards across their product line, allowing you to transfer dividers when you size up from a 45-quart to a 65-quart model. Some manufacturers offer adapter kits that retrofit older divider designs to newer cooler interiors, protecting your investment as product lines evolve.
Consider dividers with universal mounting options that work across cooler brands. While not perfectly optimized for any single model, these provide flexibility for households with multiple coolers or those who borrow/rent equipment for different trip types. The ultimate long-term value comes from systems that integrate with other organizational gear—dovetail joints that accept standard truck bed accessories, or mounting patterns compatible with popular overland equipment rails. This thinking transforms your cooler divider from a single-purpose tool into a modular component of your broader adventure kit.
Frequently Asked Questions
1. Can locking cooler dividers really keep different zones at different temperatures, or is it just marketing hype?
When properly installed with quality gaskets, dividers create measurable temperature differentials of 5-15°F between zones. The key is preventing direct air exchange while allowing minimal circulation to avoid hot spots. Real-world testing shows well-designed dividers maintain a 35°F protein zone and a 48°F produce zone in the same cooler with a single ice layer at the bottom.
2. Will installing dividers reduce my cooler’s total ice life?
Paradoxically, quality dividers often extend overall ice life by reducing the frequency and duration of lid openings. When you can grab a drink from a designated beverage zone without rummaging through food, less cold air escapes. The dividers themselves add minimal thermal mass and, if properly sealed, prevent warm air infiltration into ice zones.
3. How do I clean divider gaskets without damaging them?
Remove gaskets from their channels and soak in warm water with a mild dish soap solution. Use a soft brush to clean crevices, avoiding abrasive pads that can scratch the surface where mold colonizes. For sanitizing, a 200 ppm quaternary ammonium solution is ideal—it’s food-safe and won’t degrade silicone like bleach can. Always air-dry gaskets completely before reinstallation to prevent moisture trapping.
4. Can I use locking dividers in a soft-sided cooler?
Generally, no. Soft coolers lack the rigid walls necessary for locking mechanisms to gain purchase. The flexible fabric sides will simply deform under pressure. Some manufacturers make lightweight, non-locking partitions specifically for soft coolers that rely on friction and item weight to stay positioned, but these provide minimal thermal separation.
5. What’s the ideal number of zones for a weekend road trip?
For 2-3 day trips with two people, a two-zone system suffices: a lower cold zone for perishables and an upper cool zone for produce and drinks. For families or longer trips, three zones offer better organization: frozen base, refrigerated middle, and crisp upper section. More than three zones in a standard cooler creates sections too small to be practical.
6. Do dividers work with dry ice?
Yes, but with critical cautions. Dry ice creates extreme temperature gradients and sublimates into CO2 gas, which can pressurize sealed compartments. Use vented dividers with dry ice to prevent gas buildup, and never create completely airtight zones. Position dry ice in the lowest section with a solid divider above it, then vented dividers for upper zones.
7. How do I prevent dividers from rattling on bumpy roads?
Quality dividers with robust locking mechanisms shouldn’t rattle. If you experience noise, first check that all locks are fully tightened. Add thin adhesive foam tape to divider edges where they contact cooler walls. For persistent issues, slightly loosen locks and retighten while the cooler is loaded—this allows the divider to settle into its loaded position rather than its empty geometry.
8. Are magnetic dividers safe for electronic devices like phones or cameras stored nearby?
The magnets in cooler dividers are shielded and oriented to create a closed circuit between divider and cooler wall, with minimal external field leakage. They’re generally safe for electronics more than 2 inches away. However, avoid storing magnetic media like old hard drives or hotel key cards directly against the cooler exterior near magnetic mounts.
9. Can I cut or modify a commercial divider to fit my cooler?
Modifying voids warranties and compromises structural integrity, but it’s sometimes necessary for odd-shaped coolers. If you must cut, use a fine-tooth saw to avoid melting plastic, then seal all cut edges with food-grade epoxy to prevent water intrusion and bacterial growth. Never modify locking mechanisms or gasket channels—replace those components entirely rather than attempting alterations.
10. How do I store dividers between trips to prevent warping?
Store dividers flat in a climate-controlled space, never leaning against walls where gravity can cause creep deformation over time. Remove gaskets and store them uncompressed to maintain their shape. For adjustable dividers, collapse them to minimum size to relieve spring tension. If dividers have been in cold storage, allow them to reach room temperature before adjusting or cleaning to prevent material stress.'